Friday, December 26, 2014

Hamming it up

Nine of us for early dinner this year, and a new approach (for me): a move away from Harvey's beloved roast dinner, and I didn't make a Christmas pudding.  Instead we had a half-ham from Cameron Harrison in Kelburn (their ham won best in New Zealand this year).
         My smartest move was at the butcher's the day before - they weren't busy when I got there, so I asked them to skin and score it for me. What would have taken me half an hour and lots of swearing took them two minutes.  I took lots of advice about glazing and warming the ham (it's already cooked, of course), and settled for a simple but delicious glaze of quince jelly (made by friends) with a dash of Dijon mustard. Not very good photos though - blame it on the champagne...


With it there were boiled Jersey Benne potatoes, roast kumara with chili dressing, and a trio of vegetable salads, which were partly trad and partly invented: a green one, a ruby one, and a red, orange and yellow one.

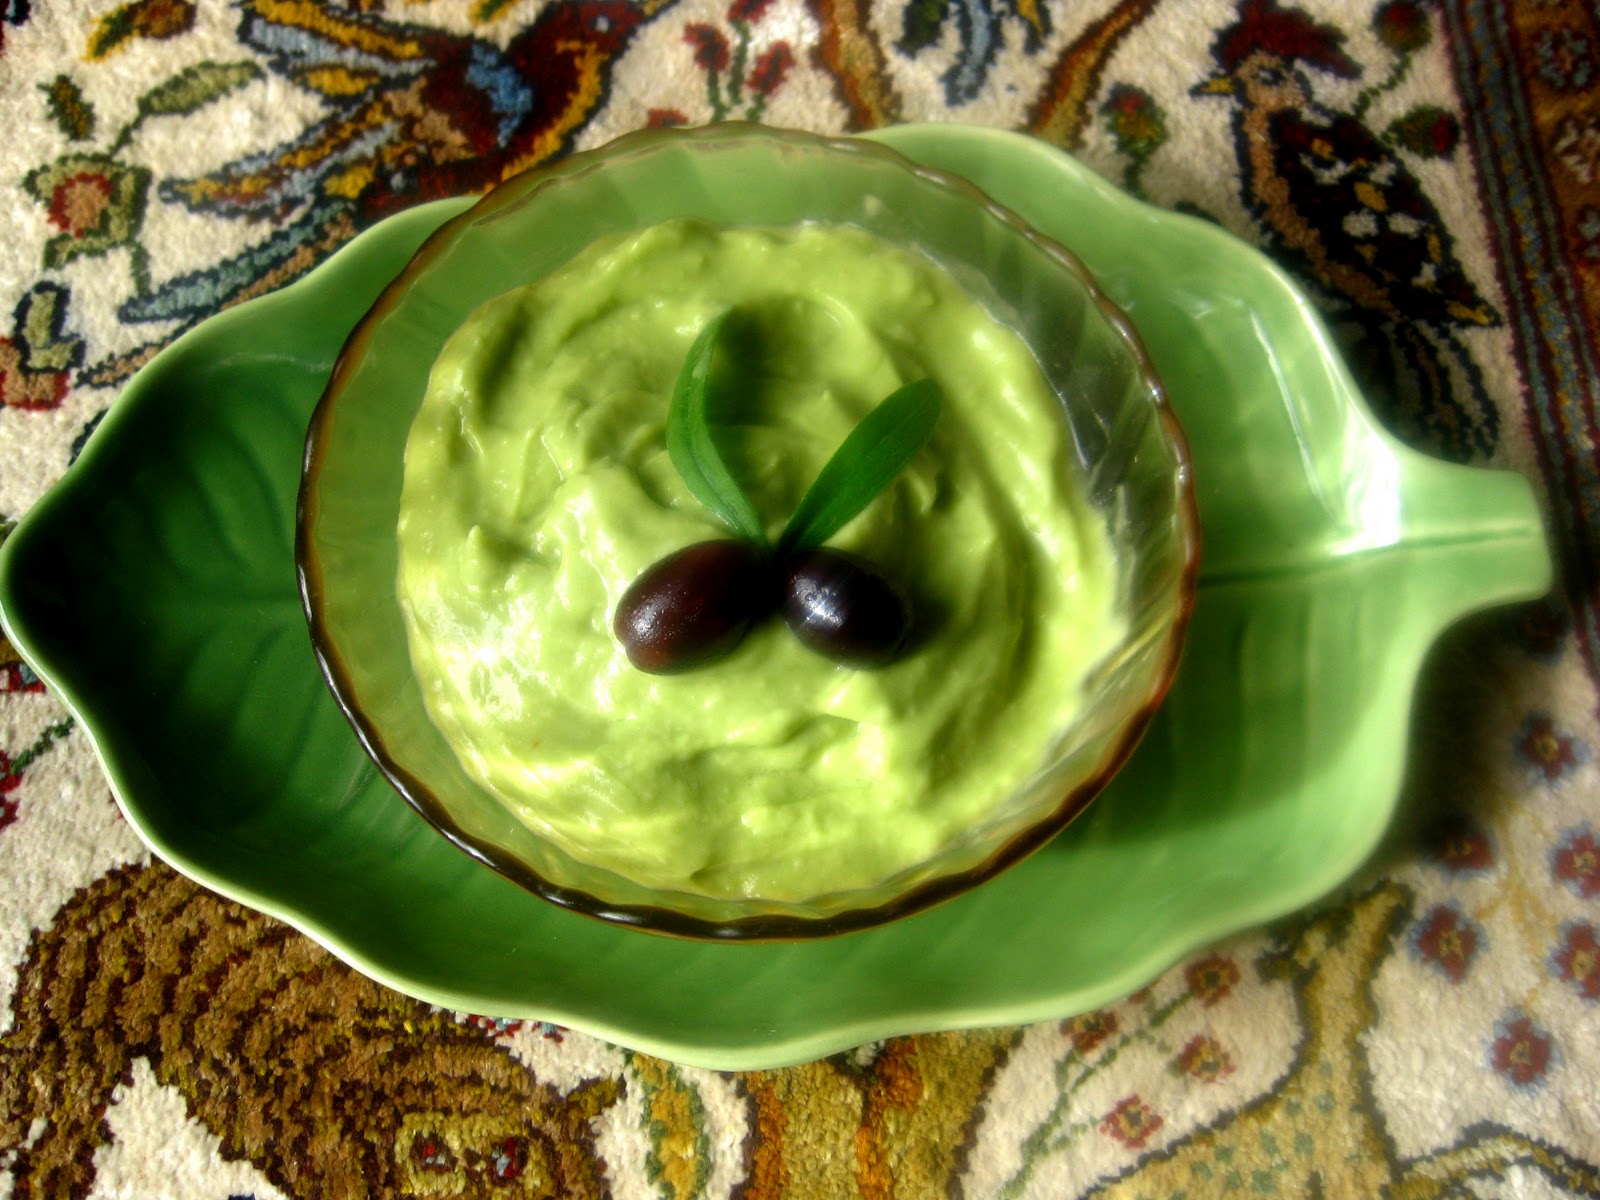
The green one had to be made mostly on the day: ribboned courgettes and spring onions (from the Hill St market) with chunks of avocado, lightly cooked skinny asparagus, finely chopped mint, and a sharp lemon and avocado oil dressing. The courgettes and mint went into the dressing a couple of hours before serving, and the rest was added just before we sat down.  The pretty lettuce serving as a frilly surround is my Drunken Woman Fringed Head.


For the ruby one, inspired by my neighbour, I roasted very small whole tinned beetroot, drained and cut in half if they were a bit bigger, with lemon zest, finely chopped garlic, brown sugar and balsamic vinegar, first wrapping them in foil lined with baking paper, and cooking for 30-40 minutes at 180C. (Of course you could make this with fresh beetroot, but it would take much longer and it's hard to get very small ones.  Roasting the tinned ones this way changes their flavour.)
         On the day, I combined finely chopped red onion (soaked briefly in salted warm water to make it milder) with finely sliced radishes. I added the beetroot just before serving, with a dressing made of good olive oil and a superb blackcurrant and balsamic reduction, sent for Christmas by my sister. Then I mixed in pomegranate seeds - such beautiful, ancient things, and I hadn't used them since I lived in Albania. I topped it off with a scattering of borage flowers offered by two of my guests.


The last salad was based on the recipe for "Insalata di peperoni arrostiti" in Antonio Carluccio's Invitation to Italian Cooking. He says it "improves with standing, and is excellent eaten the next day", so I could make it on the 24th.

Roasted pepper salad
4 fleshy yellow and red peppers (I added an orange one too, and slightly increased the dressing quantities)

Halve or third the peppers, removing the seeds and white inside bits,  and grill them skin side up, spread out on a grill pan, or skin side down on a barbecue if you're having one, until the skins go wrinkly and blacken in places.  (You can also blister them individually over a gas flame, but this mass cooking is much faster - only they do need careful checking to make sure they aren't getting too charred, and you'll need to move them around a bit to get even coverage.)

Put the peppers into a plaastic bag or bags, twist the neck, and leave till cool. Then peel or scrape off the skins with a sharp knife. Slice the peppers into thin strips (no more than 1cm wide).

2 cloves garlic, coarsely chopped
3 Tbs good virgin olive oil
1 Tbs parsley, coarsely chopped
salt

Place the pepper strips in a serving dish and toss with the garlic. Dress with the oil, parsley and salt.
Leave until needed (preferably overnight). Check seasoning before serving.


I wanted to get tomatoes in somewhere, so I added halved baby oval tomatoes at the last minute.
Two of these salads, and the kumara, were slightly sweet or sweet/sour, and the green one had lovely fresh flavours. They were all very good with the ham.
         The other four courses - starters, cheese, dessert, afters - were supplied by my guests. The black forest trifle had to have its photo taken before the spoons went in.


Sunday, December 7, 2014

Lemon and almond tart


Lois Daish once wrote in a Listener column that when she was running her Brooklyn restaurant, a dessert called a tart was chosen much more often than an identical one called a pie. Somehow pie sounds stodgier, whereas tart sounds lighter and, well, more tart - especially in the case of fruit tarts.
       Needing to take a dessert for a group lunch with our beloved friends visiting from Arizona (that's some of us in the photo), I thought a lemon tart would be a good choice, especially as I now have MY OWN LEMONS.


So I turned to Julia Child. Surprisingly, she doesn't give a recipe for the classic kind of French lemon tart, with its smooth creamy filling. (I have another recipe by Joel Robuchon which produces a magnificent result, but it is very time-consuming.) Instead she offers a somewhat more substantial tart made with lemon and ground almonds, which looks remarkably easy - and it is.
          I've changed the measures to metric where necessary - it's so annoying that the new edition of her book didn't include these as well as the old ones! I've broken up the recipe the way she does, with each set of ingredients, then the instructions for them (though hers sit alongside each other). I've always found this a really helpful way to read a recipe - but you do need to go through all the ingredients first to make sure you've got them. And for the very first time, I found a mistake in Julia's recipe - see below.

Tarte au citron et aux amandes
(from Mastering the Art of French Cooking Vol. 1)

A precooked sweet pastry shell, made in a tin 23cm across and about 2cm deep
 (If I have plenty of time I make the pastry myself, if not I use bought sweet pastry. Don't let it get too brown when you precook it, as it has to cook again with the filling.)

3 lemons (She never says what size, so I assume medium - that seems to work)
a lemon zester which produces long thin strips, rather than finely grated zest

Take off the yellow skins of the lemons to produce strips. Simmer 10-12 mins in water and drain thoroughly.

(She doesn't say so, but it pays at this point to halve the skinned lemons, put them in a microwave proof bowl and microwave on high for 30 seconds. Squeeze the juice from the lemons, straining it into a small bowl, and set aside. Briefly microwaving lemons makes it far easier to extract the maximum juice from them.)

2 cups granulated white sugar
2/3 cup of water
1 tsp vanilla extract
A small saucepan

Boil the sugar and water to the thread stage (110C). Add the drained lemon peel and vanilla and let it stand for 30 minutes.
(I don't have a candy thermometer and have never quite known how to get to the thread stage. So I just boiled it for a few minutes, stirring, until it formed a syrup, then took it off the heat and put in the lemon skin and vanilla. This seems to work perfectly well.)

Preheat oven to 160C (or use fan bake set to 150C).

2 eggs (again, she never mentions size - size 7 is fine.)
1/2 cup white granulated sugar
large mixing bowl

Beat the eggs and sugar with an electric beater for 4-5 minutes until mixture is thick, pale yellow, and falls back on itself forming a slowly dissolving ribbon. (Isn't that beautiful?)

1 more large or 2 smaller lemon/s
(I have added this as a separate stage)
Zest the skin of the lemon/s, this time producing finely grated rind, and put it in a small bowl.

1 and 1/4 cups (113 grams) ground almonds
This is where the rare mistake came in. Julia says "1/4 cup (4 ounces)". I knew that 4 ounces was much more than 1/4 cup, and assumed the actual measurement was the correct one. I weighed out the ground almonds, then put this into cups. Neatly pushed down slightly, it comes to 1 and 1/4 cups, so that must be what she meant here. But best to weigh it - it needn't be exactly 113 grams.
1/4 tsp almond extract

Beat the almonds, almond extract, finely zested lemon rind, and half the lemon juice from the first 3 lemons into the egg and sugar mixture. Taste it and add a little more juice if you want it slightly sharper. (That's me, not Julia, but it works.)

Pour this lemon and almond cream into the cooked pastry shell. Bake in the middle of the preheated oven for about 25 minutes (it may take a little longer, but check it carefully.) Tart is done when cream has puffed, browned very lightly, and a thin skewer poked into the middle comes out clean. Slide tart onto large rack to cool. (Or if it's still in the tin, as mine was, stand the tin on a rack.)

Drain the strips of lemon peel from the sugar syrup and strew them over the tart.
(I love that word "strew" - it sounds so carefree - but usually it means "very carefully distribute so they'll be more or less evenly spread.")

Julia then says to "boil the syrup down until it is a glaze (last drops are sticky when they fall from a spoon) and spoon a thin coating over the top of the tart." But I thought this would make it too sweet, so instead I kept the syrup to use with other fruit later.


As I had to transport the tart, I left the shell in the tin I had baked it in, filled it and baked it again, then took the whole thing with me. I did try to take it out of the tin, but stopped because this was making the filling shrink back a bit from the sides, which were in any case a little too brown. So I took care of all that by putting a ring of whipped cream round the top once I got there - it needs whipped cream with it anyway. And I didn't use as much lemon rind as she specifies, since the lemons had marked skins. I cunningly used the strips I had to hide the cracked bit in the middle, caused by baking it for a little too long and poking it too enthusiastically to test it.
       But apart from these real-life imperfections, it tasted really, really good, and I think it was better because it was still a little warm when we ate it - Julia does say you can serve it warm rather than cold, and I always prefer that with any kind of pastry. I'll be making this again.

Thursday, November 20, 2014

Kitchen whizz!

I spent most of this morning in the kitchen, getting food made and semi-prepared ahead of time so that everything would work well tonight and tomorrow night. Tonight I was having my neighbour, Frances, in for one of our regular dinners.  Tomorrow my visiting Arizona friend is coming home with me after we've had a day out and about together. She's a vegetarian, whereas Frances emphatically is not.

So today I gathered up from the fridge some mushrooms, bacon and the chicken thighs I bought yesterday. I turned all this, along with garlic, onion, herbs, vermouth and stock, into a nice little chicken casserole, which was going to become a pie later - because I had some leftover flaky pastry too, so that just needed rolling out and putting back in the fridge to chill.

While the casserole was in the oven I halved two big orange and red peppers and set them near the bottom to semi-cook, ready to be stuffed with rice, cheese and herbs tomorrow and baked a bit longer. Then I laid out rows of heart-shaped sliced strawberries on baking paper, sprinkled them with sugar and put them in to cook at a low temperature once everything else was done. There were enough for dessert tonight and tomorrow. (You can see the recipe here.)


While they were cooking, I made guacamole - again, enough to do double duty as an hors d'oeuvre for tonight and tomorrow.


I'm lucky that I now have the luxury of being able to do such things in the daytime. If I was still going out to work, I wouldn't be embarking on mid-week dinners like this. It's taken me years of experience to know how to come up with menus that are manageable in terms of time and effort, don't cost heaps because they make use of what I already have, and still look and taste really good and work well as a whole. I enjoy doing it, and I'm pretty sure my friends really like eating it all - I know I do.

Sunday, November 9, 2014

Gingerbread time again

Some of you will have already had an email from me, or a message from Marsden Books, or seen the notice on my Facebook page, about Tuesday evening, 11 November (which happens to be Armistice Day, and also Sonja Davies' birthday). Marsden Books is hosting an evening for me and Helena Brow - two local Karori memoirists - at 7 pm, and I promised to make gingerbread for it. So today I got it done.


I last posted about gingerbread, and gave the recipe, in December 2010. In the second to last chapter of my book, I explained why I made it back then, and why I remember it so well:

"In November I made the Christmas pudding but not a Christmas cake – unlike most men, Harvey didn’t care for it and I wasn’t bothered. I’d taken to making a really good gingerbread in December instead, giving us something we both liked and that kept well to serve visitors. By the Wednesday before Christmas we had had so many visitors there wasn’t much left in the tin. I cut it up carefully and put it out for that afternoon’s arrivals, then went out to finish the shopping, knowing Harvey was well looked after. When I came home there were three small pieces left – his visitors had enjoyed it, but he hadn’t had any. I sat down with him for a late cup of tea and he asked for a piece, then the second and the third. I watched him eat with astonished delight. It was almost the last thing he ate at home."


Wednesday, October 15, 2014

By Grand Central Station I sat down and - ate oyster stew

I spent a good part of the morning touring Grand Central Station with a lovely guide who sounded exactly like Garrison Keillor (of Lake Wobegon fame). In the 1970s the owners wanted to pull it down. It took 10 years to fight them through the courts, but the city won and it's now a restored marvel.


After the tour there was only one thing to be done - I had to go to the Oyster Bar for lunch. I knew it was what Harvey would have done, only he would have had the raw oysters, whereas I got the oyster stew - really a creamy soup with a modest number of oysters in it, but perfectly delicious, especially with a slightly oily, fragrant glass of Californian sauvignon blanc. Harvey would have been proud of me.


Monday, September 15, 2014

Here's one I prepared earlier...

Almost famous! Well, for a few days anyway. I talked to Kathryn Ryan about The Colour of Food last week, and you can listen to it here - with recipes, including one from Albania.


Then on Thursday we had a launch for the print edition at Unity Books. For the first time in my life, I had a queue for book signing.

This coming Wednesday morning I'll be cooking and talking about my book (at the same time!!) on TVOne's Good Morning, at 9 am.

I've been told I have precisely seven minutes, which of course isn't enough time to finish cooking hardly anything. So at the end I'll get to do something I've always wanted to do - whip out the completed dish and say, "Here's one I prepared earlier!"


Thursday, September 4, 2014

Comfort in a bowl of soup

In August my son came for three weeks, on holiday from his teaching job in China. We roamed around Wellington hunting down the best cakes and coffee - in China he can find reasonably acceptable cake, but only in limited varieties, good coffee is extremely hard to come by, and almost never can he get the two together in one place.  And the winners are:
Best Muffin: blueberry and lemon muffin at Karaka Cafe on the waterfront lagoon
Best Lemon Tart:  tarte au citron at Bordeaux.
Best Chocolate Tart: Veronique's tart at Le Marche Francais.
Best Chocolate Cake (well, almost fudge): chocolate nemesis at the Aro Street Cafe.
Runner-up: gluten-free chocolate and orange fondant at Floriditas.
Best Other Kind of Cake We Came Across: tiramisu cake at California Garden Centre cafe in Miramar. (I should have photographed the cut slice to show the wondrous layers.)


When he left, I missed him terribly, and had to quickly set about providing myself with some kind of comfort food that wasn't yet more cake. The answer seemed to be pea and ham soup. Harvey loved it and used to make it quite often, but I don't think I've made it since he died.
         I had a nice little bacon hock in the freezer, so I fished it out and went in search of split peas. I wanted the yellow ones, but couldn't find them in any supermarket. I finally tracked them down at Moore Wilson, a couple of dollars for 500g, so not expensive at all - just another one of those old-fashioned staples that has vanished from most grocery shelves.      

The recipe I used is from my original New Zealand soup bible, Digby Law's Soup Cookbook. The only new thing I did was cook it in the slow cooker. You need to add enough water to cover the contents by about 1cm, and check it after a couple of hours to see if it needs more water - those peas absorb a lot of liquid. Otherwise, this couldn't be simpler or easier to make, and it's the most comforting comfort food you could wish for.

Old Fashioned Pea and Ham Soup
(adapted from Digby Law - I think it serves 8-10, rather than the 12 he suggests)
1 bacon knuckle (hock) or bacon bones
500g yellow split peas (Digby says green, but I prefer yellow)
1 large onion, finely chopped
2 sprigs mint
1 or 2 bay leaves

Heat the slow cooker on high while you chop the onion and pick the herbs. (If you haven't got one, cook it in a very large pot over a simmer mat on the lowest heat possible after bringing the water to the boil..)
Put everything into the slow cooker and add enough water to come 1cm above the ingredients.
Cook on high for 2 hours. Check level of liquid and add more water if necessary.
Cook on high for another 2 hours or until peas are mushy. (Depending on your slow cooker, you may need to reduce the heat to low for part of this second stage.)
Remove bay leaves. Remove bacon bone/s and set aside. Let soup cool and check seasoning.
If you have a soup wand, use it to puree the peas and liquid, or just mash them up as much as you can. Remove meat from bacon bones, discard fat, shred bacon into small pieces and return to soup.
Heat the quantity you require and keep the rest in the fridge or freezer for later.


The soup will be beautifully thick and smooth, and Digby Law says to serve it piping hot garnished with mint and with lots of brown bread toast. When it cools, it gets so thick you can almost eat it in chunks (so you'll need to add more water when you reheat it). Left thick, it's a very ancient staple called pease porridge, as in the old children's clapping rhyme (first recorded in 1760):
Pease porridge hot
Pease porridge cold
Pease porridge in the pot
Nine days old
Some like it hot
Some like it cold
Some like it in the pot
Nine days old.
You could very well eat it cold and still enjoy it very much, but I'm not at all sure about nine days old. One day I'll leave a bit out that long and see what happens to it.

By the way - the print edition of my food memoir has arrived at Unity Books in Wellington, so it should be in other shops now or very soon.

Saturday, August 16, 2014

A good gratin

This time last Saturday I was feeling nervous. A friend had been given, and had passed on to me, a beautiful piece of sirloin cut into thick steaks. (Actually I wasn't quite sure if they were indeed sirloin steaks, but I took them up to the legendary Gipps St Butcher to make sure.) I was charged with cooking them for him and his partner, two more friends, and me and my son (who is visiting from China).
           I don't deal with meat like this every day. I haven't even tried to take their photo - meat is notoriously hard to show looking good. But I did make a rather good potato gratin to go with them, plus a salad.
            Gratin takes a bit of trouble to make, but it's really good for dinner parties because all the fiddly stuff can be done well in advance. It cooks quietly in the oven and sits there obediently waiting until you've dealt with the steak and salad. It also looks very nice on the table.
             The classic is gratin dauphinois, made with milk, cream and sometimes Gruyere cheese. But I thought its humbler cousin, gratin savoyard, would be better with the steaks. It's made with stock, a little butter and, in my case, a little wine as well.
               
Gratin savoyard 
(adapted from Richard Ehrlich's recipe in The Lazy Cook)

500g Agria potatoes, preferably even in size, oval-shaped and small enough to go, peeled, through the feed-in tube of the food processor
2 large cloves garlic
250ml good chicken stock (I've taken to using Simon Gault's squeezable plastic sachets of concentrated stock, made up with hot water.)
100ml dry white wine
30g butter

Set oven to 180C.
Peel and crush the garlic. Peel the potatoes and feed them through the slicing disc of a food processor.
(If you haven't got a processor, and don't want to spend a long time trying to get even thin slices, cut them into roughly even chunks about 1cm square.)
Butter a large round or square ceramic oven dish. Spread an even layer of overlapping slices (or a layer of chunks) into the dish. Season very lightly with salt and pepper and scatter over tiny bits of garlic. Repeat until the potatoes and garlic have all been used up and the dish is close to full. It helps to select and keep back a layer of nice even slices for the top. Dot the top with small bits of butter.
Reduce the white wine by half in a small saucepan. Prepare the stock. Mix the two together, tasting to check that it's not too salty.
Pour enough liquid over the potatoes to come a little way up the sides. Reserve any left in case the potatoes start to dry out too much during cooking.
Put a layer of foil over the potatoes, dull side uppermost. Cook for 50 minutes. 
Remove the foil. Check dryness, adding a little more liquid if necessary.


Cook for another 10-20 minutes, until the top is turning a little brown and crisp, and a thin knife or skewer slides easily down through the potatoes to the bottom of the dish.


I turned the oven down to warm and put the gratin on the bottom shelf while I made the salad and prepared the steaks (taken out of the fridge and patted dry when I first put in the potatoes) with a brush of oil, and a light sprinkle of salt. Then I lined them up under the fan grill and cooked them just until they were no longer really soft, but definitely not really firm either. (Sirloin does need a little more cooking than fillet, I think.)
            We didn't need much else - well, just a little antipasto beforehand, with some cheese, a lemon tart and a few chocolates after, courtesy of my guests, not to mention some very fine wine from the steak provider... a Saturday night feast of food and friendship.


Friday, August 1, 2014

Shortlisted for labour history award!!

I just heard today from Awa Press that my memoir was short listed for the Bert Roth Award! The winner, also published by Awa, was Rebecca Macfie's superb book on Pike River. I was so thrilled to have made the shortlist. Here's what the judges said:

"Anne Else’s food memoir The Colour of Food ... explored women’s work. More personal than the rest of our nominees, this beautifully written e-book told Else’s life history through the meals she ate and the meals she prepared. Else describes significant changes in the work of home cooking as New Zealand food culture changed.  As Else was deeply involved in the New Zealand women’s liberation movement, her memoir also explores the politics of unpaid labour, and the monumental challenge women mounted to the status quo in the 1960s and 1970s.  Else demonstrates the importance of personal stories and individual lives."


Tuesday, July 29, 2014

The Colour of Food goes into print!


Best-selling New Zealand “eriginal” food memoir heads for a print edition
From Awa Press

With the help of some mouth-watering recipes and sage advice from the Duchess of Windsor – “If you don’t take care you may serve an entire meal pinkish mauve, from lobster bisque to sherbet” – Anne Else’s memoir of her food-entwined life rocketed to five stars and the No. 1 spot on Amazon’s food memoirs’ bestseller list within a few weeks of its release as an ebook original,  and has stayed there for months. Its publisher, Awa Press, was so impressed it decided to release a print edition. 

The Colour of Food: A memoir of life, love and dinner is due for paperback release in September. Anne Else writes of her life from childhood to marriage, motherhood and now, in her 60s, forging a community of new friends through her food blog Something Else to Eat. Along the way there’s feminism, divorce and remarriage, finding her birth mother, and the heartbreaking loss of her 18-year-old son Patrick and of her husband, poet Harvey McQueen, who died on Christmas Day 2010.

These tales of love, joy and sadness are seasoned with memories of the food that has enriched her life – from “shin meat stew with plump fleshy pieces of kidney” in her childhood, to Harvey’s “venison and sour cherries in a sauce made with cream, Dijon mustard and the cook’s own home-made crab-apple jelly”, and the “salade composĂ©e with good blue cheese, a sliced apple or pear and Waikanae friends’ walnuts strewn over my own rocket” that she eats alone. 

Wellington cook and food writer Lois Daish is one of many who have heaped praise on Else’s memoir. “I love this enchanting book,” she says. “Anne Else’s poignant story shines a light on how food is intertwined with the joys and sorrows of everyday life.” 

Sprinkled with recipes from each era of Anne Else’s life, The Colour of Food is a story that lingers long after the final – printed! – page has been turned.


Sunday, June 29, 2014

Scrumptious spicy chicken

I don't always save the recipe pages from the Listener, but I was really glad I saved the one from 24 May. Lauraine Jacobs was featuring a new book by UK-based, multi-award-winning food writer Diana Henry: A Change of Appetite: Where Health Meets Delicious. I have a small problem with that title - it does make it sound as if "healthy" and "delicious" don't normally meet, when surely they very often do. But But the recipes sound very good, and recently I made one of them for myself. It was so easy and tasty and realtively inexpensive that I made it again as the main course for a visiting friend last week.
         I did tweak it a little bit. Even though iI was cooking for two instead of four, I used the same amount of flavouring ingredients - naughty, I know, but there still wasn't a lot of sauce and I like spicy food. I left out the star anise, because I don't like aniseed flavour at all, but I've left it in the recipe because most people probably would like it.
         One of the few foods I dislike is cooked pumpkin, so I used kumara instead, and I thought that worked really well. For the two of us, I cooked four large chicken thighs and two large kumara. I didn't have any spring onions, so I cooked ordinary chopped onion with the garlic.
         If you are making it with pumpkin I suggest that you first chop it into large chunks and then microwave it for just long enough to soften the skin. This makes it much easier to peel. As you can see from the photo (which is the one from the Listener - once again I forgot to photograph mine!) - the pumpkin or kumara chunks should not be too large, so that they cook through in the same time as the chicken.
       

Chicken and pumpkin with soy and star anise
(Diana Henry, courtesy of Lauraine Jacobs in the Listener, 24 May 2014)
Serves 4.

1 Tbsp peanut oil
8 bone-in chicken thighs
2 Tbsp soy sauce
2 Tbsp rice vinegar
2 Tbsp fish sauce
2 Tbsp soft dark brown sugar
1 red chilli, deseeded and shredded (I used chilli flakes)
2.5cm piece of ginger, peeled and very finely chopped
3 garlic cloves, very finely chopped
8 spring onions, trimmed and chopped on the diagonal
900g pumpkin or squash, cut into chunks, peeled and deseeded, or kumara, peeled and cut into chunks
3 strips of orange zest
1 star anise
2 Tbsp orange juice (i used a bit more, and less water)
Black pepper

Preheat the oven to 180C (or 170 fan-forced).
Remove the chicken skin if you prefer (I used skinless).
Heat the oil in an oven-proof casserole dish or saute pan that can go in the oven (large enough to lie all the chicken in a single layer).
Brown the chicken on both sides. Don't try to turn the thighs until they are easy to move, as pulling will tear them. Take them out of the pan and set aside.
Pour the fat out of the pan into a cup. Mix the soy sauce, vinegar and fish sauce with the sugar and stir.
Put 1 Tbsp of the reserved fat back in the pan, heat it and add the chilli, ginger and garlic. Keep some of teh greener bits of spring onion back for garnish and add the rest to the pan.
Cook over a medium heat for a couple of minutes, until the garlic is golden, then add the soy sauce mixture. Return the chicken to the pan, with any juices that have seeped out, plus the pumpkin, orange zest, star anise, orange juice and 3-4 Tbsp of water.
Grind on some black pepper. Cover the dish and put in the hot oven for 40 minutes in total. After 15 minutes, turn the chicken pieces over. (It helps to turn the pumpkin or kumara over too.) Cover again and cook for another 15 minutes. Then uncover the dish and return to the oven to cook for another 10 minutes. (The sauce will reduce to a lovely stickiness. But keep an eye on it to make sure it isn't hardening.)
Scatter with the reserved pieces of green spring onion and serve. Accompany with brown rice, quinoa or wheat berries tossed with lots of chopped coriander leaves and lime juice.
Recommended wine match: Chardonnay.


At my age I don't need masses of carbohydrate, so I didn't add the rice - instead I made a shredded carrot and cabbage salad with a small amount of Asian flavoured dressing, using lime juice, fish sauce , soy sauce and a little sugar. If I'd had any coriander I would have used that too.
          I thought this was a really successful dish, not too strongly spiced, so you get the full flavour of the chicken and pumpkin/kumara, but spicy enough to have you licking your lips with huge appreciation. Thank you, Lauraine and Diana.

Saturday, June 7, 2014

Light lemony pancakes

One of the many good things about Moore Wilson is their little stacks of free recipes. Ages ago I picked up one for Lemon Cottage Cheese Pancakes. At home I stowed it neatly away and forgot about it, but a fortnight ago I came across it again, and decided to liven up Queen's Birthday by trying it out on a willing friend for brunch.
      I always wonder if people like the Queen ever get to indulge in such simple pleasures. Does she just stick to the same routine, or does she ask her kitchen staff to surprise her with something new? Somehow I don't get the impression that she's terribly interested in food anyway. I learnt very early on that her actual birthday is 21 April, because that was Mum's birthday too.
       Anyway, the recipe worked so well that I made it again today for my neighbour, who told me she loved pancakes and hadn't had them for years. This time I made bigger ones, but that wasn't quite as successful - a large hotcake size seems best.

Lemon cottage cheese pancakes
 (Moore Wilson)
Makes 6 smallish pancakes, really only enough for 2 people. Double it for 4.

3 large eggs
1/4 cup self-raising flour
3/4 cup plain cottage cheese
1/4 cup butter, melted
2 Tbsp sugar
1/4 tsp salt
1 Tbsp grated lemon zest
Butter for cooking (the recipe doesn't say this, but I think it cooks and tastes better with a little butter)

Set the oven on 75 degrees or the warm setting, and put in two large plates.

Separate the eggs, putting the whites into a large bowl and the yolks into another large bowl.
Mix the yolks together with the flour, cottage cheese, butter, sugar, salt and lemon zest until well blended. (Don't over-mix it - the little lumps of cottage cheese are fine.)


Beat the egg whites until they hold stiff peaks. Fold the whites gently through the yolk mixture.
Heat a large non-stick pan over medium heat. Add a lump of butter, enough to lightly coat the pan.
Pour 3 large hotcake size dollops of batter into pan, keeping them separate.


Cook gently for about a minute and a half. When little bubbles rise through and the pancakes are nicely browned underneath (lift a corner to see), flip them over and cook the other side.


Place the cooked pancakes in the oven on a warmed plate. Cook 3 more.
Serve with your choice of:
crispy bacon, runny honey, maple syrup, lemon juice, cream, yoghurt (or a whipped mix of both), poached fruit. I had ready a mix of rhubarb, feijoa and pear, cooked with brown sugar and a little lemon syrup.


As you can see, I just managed to get a photo before they started to be eaten. Both my visitors went on at gratifying length about how light and delicious these were. They're a kind of cross between a traditional pancake and a really good pikelet, but the cottage cheese and lemon add something special. Maybe I'll try to invent a savoury version...

Thursday, May 29, 2014

Doing things to oysters

I see that I haven't put a post up since 1 May - shocking. No real excuses at all, simply a fit of winter slothfulness and avoiding coming up here to the main computer (which is much easier to write on than my iPad) because it's warmer downstairs.
        But this long gap doesn't mean I haven't been cooking - quite the opposite. What I tend to do quite often these days is get an idea, look up several different recipes related to it, then pick and choose bits of them and assemble my own version to suit the ingredients I have on hand, the amount of effort I want to put in and my own judgement about what will work best.
        Earlier this month I had a (not very significant) birthday. There have been a series of delightful lunches and other outings with friends, with at least one more to come. But generally the evenings have been spent at home, sometimes cooking for friends. On my actual birthday, though, I was home alone, so I made the most of it.
         Harvey loved oysters, and so do I. But he wanted to eat them in only two forms: completely au naturel, with lemon, pepper and thin bread and butter, or battered and deep fried. (Sent up the road to get a parcel of fish and chips for dinner, he was very good at turning it  into something much more sexy by throwing in a dozen oysters.) So when I saw a $10.95 oyster special at Countdown, I decided I would break out and do something different with them.
          The pottle turned out to contain six very large oysters. I ate two all by themselves as a starter, then set about turning the rest into a sauce for pasta. I looked at half a dozen recipes and came up with my own super-simple version.

Pasta with oysters for one
(Just size it up for more servings - hungry people may well eat 100g of pasta each. The quantities for the wine and cream are only approximate, since it depends on the amount of oyster liquor, the size of the oysters, and how oystery you want it to taste.)

75g linguine, preferably bronze die cut (see here)
tender white and green parts of one small leek, chopped into fine rings
20-30g butter
2 small rashers streaky bacon, cut into small pieces
4 large or 6 smaller oysters, with their liquor
approx. 250ml dry vermouth or dry white wine (I prefer vermouth)
juice from half a small lemon
freshly ground black pepper
75ml cream (or more to taste - if you like a blander sauce, use more cream)

Cook the pasta in a large pan of boiling salted water. When it is al dente, remove 2 tablespoons of the cooking liquid and reserve. Drain the pasta, return to pan, stir in a small piece of the butter, and keep warm.
In a shallow non-stick pan, gently cook the bacon pieces in their own fat, remove, and set aside.
Melt the butter and gently saute the leeks. Remove and set aside with the bacon.
Drain the oyster liquor into the pan and add the vermouth or wine and the lemon juice. Bring to the boil, turn down to a simmer and put in the oysters, cut into pieces if they are large ones. Poach the oysters for 2 minutes, remove and set aside.
Warm a wide shallow pasta plate.
Increase the heat under the pan, add the 2 Tbsp saved pasta water, and boil gently until the liquid is reduced to about 1/2 cm in depth in the pan.
Turn the heat down to low. Put in the bacon, leeks and oysters. Stir in the cream and heat gently through. Check seasoning.
Put pasta in plate and pour over the sauce. Grind more pepper on top to taste.
Eat immediately with a glass of your favourite dry white. (Gruner veltliner is my favourite with oysters, but there are plenty of other good choices.)


This is one of the fastest dinner dishes I've ever cooked - and one of the most utterly delicious. I ate it making small appreciative noises to myself, and telling Harvey's photo that there were indeed more than two good ways to eat oysters.

Thursday, May 1, 2014

How the pork got stuffed

I've always admired stuffed food - literally stuffed, that is, not "ruined" or "gone wrong" or "completely had it". But it can be a bit intimidating to tackle. I'm a dab hand now at stuffed mushrooms, and I can manage to stuff some large veges, but there's a piece in my book about failing to make a stuffed chicken. And until a couple of weeks ago I'd never stuffed a pork fillet.
     
I had quite a small one on hand for dinner with two women friends, and I wanted to serve it with the lemon risotto in my last post. So I leafed through my Italian cookbooks. The newest one is Easy Tasty Italian, by the very glamorous Laura Santtini, and it had exactly what I was looking for: pork fillet stuffed with artichoke and bay.


Only instead of cutting a pocket in the side, as she suggested, I decided to try making a hole and pushing the stuffing down along the length of the fillet. The cooking method was my own invention, because I didn't want it to dry out. I only experiment like this with very good friends - fortunately it all worked remarkably well.

Pork fillet stuffed with artichoke and bay paste 
(after Laura Santtini. Serves 4 delicate eaters, 3 moderate ones or 2 hungry ones.)

1 small pork fillet (sorry, I forgot to note what mine weighed, but it was about 6 cm in diameter.)
For the paste: 
85g artichoke pieces in olive oil (from a jar), drained
2 bay leaves, as tender as possible
1 garlic clove
1 Tbsp olive oil
1-2 pinches of salt flakes
freshly ground black pepper
To cook:
150ml white wine
large oven bag

Set the oven to 170C.
Blend the paste ingredients together, adding a little more oil if it's too thick.
(I did mine in the food processor. I needed to pick out the remaining larger bits of bay leaf, but most of it got successfully ground up.)

Push a long thin knife into the pork fillet, not quite to the end, and wriggle it around.
Using your fingers, stuff a little of the artichoke mixture into the hole.
Using a long thin wooden spoon handle, gently push the mixture as far down the fillet as you can.
Repeat until you've used up all the mixture and the fillet is full of stuffing.

Put the fillet down into the oven bag so it's resting across the bottom of the bag, and add the white wine.
Fold the bag over loosely so the wine can't escape, and place it in a roasting pan.
Cook it for about 25 minutes.
(The pork will turn pale and be fairly firm to the touch. It will swell and become shorter. Some of the stuffing may ooze out, but this doesn't matter.)
Carefully pour off the white wine and meat juice and save it for another use. Remove the pork and rest it on a warm dish under a teatowel for 15 minutes, while you prepare a long warm serving plate and the accompaniments - mashed or boiulanger potatoes, for example, or that lemon risotto.
To serve, slice the pork neatly across to show the stuffing. Some of it escaped in mine, but that did not matter in the slightest. All very satisfying, to make as well as to eat.


Saturday, April 19, 2014

Luscious lemon risotto

A couple of years ago I read Italian chef and food writer Anna del Conte's memoir, Risotto with Nettles. Nigella Lawson says del Conte was her mentor, and you can read Lawson's review of the book here.
       I photocopied some recipes, including a very intriguing one for Lemon Risotto, which del Conte says is one of her most popular dishes. I've been meaning to make it ever since, and this week, with two close friends coming to dinner - the kind you can experiment on and they won't mind if it goes wrong - I finally managed it. I was spurred on partly by my sister giving me some lovely shallots and garlic from her garden when I was in Auckland the week before.


Anna del Conte's risotto al limone
(Serves 4-6, depending on appetites)

60g unsalted butter
1 Tbsp extra virgin olive oil
2 shallots, chopped very finely
1 celery stick, chopped very finely
(you can chop these together by pulsing them carefully in the food processor)
300g risotto rice, such as Arborio or Carnaroli
1 litre light meat stock or vegetable stock
1 large lemon with unblemished skin
6 fresh sage leaves
small sprig of rosemary
1 free-range egg yolk
4 Tbsp freshly grated parmesan cheese, with more to serve if wished
4 Tbsp cream
sea salt and freshly ground black pepper

Heat 30g of the butter with the oil in a large heavy saucepan. Add the shallots and celery and cook gently until soft (about 7 minutes).
Mix in the rice and continue cooking gently, stirring, until the rice is well coated in the fats and partly translucent.


Heat the stock in a Pyrex measuring jug in the microwave or in another saucepan.
Pour about 150ml (roughly a sixth) into the rice. Stir thoroughly and cook, stirring regularly, until the rice has absorbed most of the stock.
Repeat, stopping halfway through to add the lemon rind and herbs (see below).


While the rice is cooking, zest the rind of the lemon, then squeeze out the juice and set it aside. Chop the herbs finely. Mix with the rind and stir into the rice when it has absorbed about half the stock..  
Continue adding stock and stirring until the rice is cooked but still a little al dente. (You may not need all the stock. Del Conte says good quality Italian rice takes about 20 minutes, but I find it takes a bit longer.) Take off the heat.
Call the eaters to the table and warm a dish or bowl for the risotto.
In a small bowl, combine the egg yolk, half the lemon juice, the parmesan, the cream, the remaining 30g of butter, and a very generous grinding of black pepper. Mix well with a fork. Stir this mixture into the risotto. Cover the pan and leave to rest for about 2 minutes. Taste for seasoning. (At this point I added the rest of the lemon juice, but suit yourself.)
Give it all an energetic stir, transfer to the hot dish or bowl and serve at once, with more grated parmesan alongside if you wish (I knew we would all wish, so it went on top).


This is a surprising and remarkably satisfying dish, because it combines subtlety and richness. I can't eat it as a first course, though - too filling. So I served it with a green salad and an artichoke-stuffed pork fillet from another Italian woman's book. But I'm writing in the intervals of making a great pot of minestrone for tonight, and it's getting to the stage where it needs my full attention, so I'll post that recipe next week.

Saturday, March 29, 2014

A cape gooseberry by any other name...


Last week was Local food Week in Wellington, and I had a great time as one of four bloggers/authors speaking at The Library Bar (I say it's my favourite bar, and it is - but it's really the only bar I happily go to on my own). The others were such a pleasure to see and hear: Sue Kerr (Five Course Garden), Laura Vincent (Hungry and Frozen) and Jared Gulian (Moon over Martinborough). 
         I told some local food stories of my own, including my pride in one of my very few genuine food-growing successes. As I've confessed before, unlike Harvey I'm just not a Real Gardener - everything in the garden seems to make me itch. But thanks to Ali, who gave me a plant, I have managed to produce quite a decent crop of cape gooseberries - or as we are being told to call them now, pichuberries. Here's the next lot coming on - they aren't ready to pick until they turn a very dry pale beige on the outside, and preferably fall off (only then you can lose them on the ground).


Renaming fruits and vegetables to win a bigger market for them is nothing new.  Tree tomatoes became tamarillos, Chinese gooseberries became kiwifruit. Ever since we've prided ourselves on the world instantly associating kiwifruit with New Zealand, but...maybe not. Here's what I found on a US foodie blog tonight:
In the 1960s, the Chinese gooseberry became the kiwifruit. The new name was taken on—after decades of trial and error—when it was discovered that Americans then associated the fruit with Australia, an exotic (but non-threatening) land, instead of China.
Yes, well. The latest fruit to be rebranded is the humble cape gooseberry (Physalis peruviana, closely related to the tomatillo and more distantly to tomatoes, potatoes and eggplants). I wrote about it in my book, remembering it from staying at my grandmother's in what was then the sleepy little country settlement of Greenhithe, on Auckland's North Shore:
At night we made charred smoky toast on a  toasting fork over the fire and spread it with the jam that Mum cooked up from teh golden cape gooseberries I collected on the vacant section next door, where they ran wild over the warm slab of concrete that had once supported a house.
I thought they got their name from the pretty fluted lantern-shaped cape that covered them, turning into a fine transparent lattice as it dried. In fact they're world travellers. The British carried them home from Peru, where they were known as aguaymanto or Inca berries, and took them on to the Cape of Good Hope in South Africa; then they made their way down to Australia and New Zealand, where they acquired their new name.
          Now they've been transformed into pichuberries (after Macchu Picchu) thanks to a new company, Mojo Tree Farm. It was created in 2010 by a University of Arizona student, Michael Popescu,  as part of his master's thesis in entrepreneurship. The company's dietician,  Manuel Villacorta, has been effectively promoting them as the new superfruit (though sceptical people point out that other fruits such as blueberries have similar characteristics).  He claims they're "useful in fortifying the liver, supporting cardiovascular activity, strengthening lungs, and enhancing fertility and food absorption". Perhaps. In any case they look pretty, taste great, and will definitely be generally good for you, so what's not to like?
          Last week I collected a decent bowlful of them. But when I went looking for recipes there was very little under "pichuberry", whereas "cape gooseberry" came up with some interesting ideas. I liked this one best, though I haven't tried it yet -and the association with chocolate, from their homelands, is attractive:


Cape gooseberries still in their lanterns
Melted dark chocolate
Peel back the lanterns, folding them away from the berry into a star shape.
Carefully dip the golden berry into melted chocolate.
Place on grease proof paper to set. 
Use beside sweet desserts or cheese board. 

But I'll mostly just go on poaching them gently in a small amount of sugar syrup with some honey added, and eating them with icecream or good yoghurt, or on top of a slice of cake - they're very good with the hummingbird cake in my previous post.


Wednesday, March 19, 2014

Sweet hummingbird

I had heard of hummingbird cake, but until last week I'd never eaten it or made it. This cake is now associated with southern states in the USA, but it's a relatively recent import there, and it's known in other places by many different names: Cake That Won't Last, Jamaican Cake, Granny's Best Cake, Nothing Left Cake, Never Ending Cake. 
         Nobody seems to know exactly where the name comes from, but there are lots of suggestions: 
- It's as sweet as the nectar that  hummingbirds drink from flowers - or sweet enough to attract humming birds...
- When the cake is served, people hover around it the way hummingbirds hover around flowers - maybe humming with delight...
- Bananas and pineapples come from the tropics, and the national bird of Jamaica is a hummingbird...
          None of these sound very convincing - does anyone have a better idea? There definitely seems to be a Jamaican connection. The Jamaican hummingbird is called the Doctor-Bird, and a recipe for Doctor-Bird Cake, including bananas but not pineapple,  appeared in the Jamaican Daily Gleaner in 1969. 
          Southern Living Magazine published Mrs. L.H. Wiggin's Hummingbird Cake recipe in February 1978 (but she didn't explain the name). That year it won the Favorite Cake Award at the 1978 Kentucky State Fair. Hummingbird Cake quickly became the magazine's most requested recipe and was voted its favourite recipe ever in 1990. 
          The Southern US version has mashed banana, crushed pineapple and pecans, with layers and cream cheese icing. The simpler New Zealand version I used has no pecans, but it does have passionfruit. I found it (thanks to my neighbour) in the March issue of Cuisine. It comes from Alice Arndell's much-praised book, Alice in Bakingland, but she got it from The Village Cafe in Martinborough. It's extremely easy, and that's the only kind of cake I make, pretty much - mix it, bake it. And it's a beautifully moist dessert cake.
Hummingbird cake (Slightly adapted from recipe by The Village Cafe via Alice Arndell, reprinted in Cuisine, March 2014)
375g mashed banana (about 3 large bananas)
1/2 c passion fruit pulp (and more to decorate - see icing, below)
425g tin of crushed pineapple in juice
1 and 1/3 c sugar
1 c vegetable oil
3 eggs
1 tsp vanilla
1/2 tsp salt
1 and 1/2 tsp cinnamon
3 c plain flour
1 and 1/4 tsps baking soda

Set the oven to 180C (if you have a fan, don't use it, just use "bake").
Grease and line the base of a 23cm round loose-bottomed cake tin or 2 smaller tins.
(You could make two layers and stick them together with icing, as they do in the USA, but this does seem like overkill.)
Put the three fruits into a large bowl and mix to combine.
Add the sugar, oil, eggs and vanilla and mix to combine.
Add the dry ingredients and mix until evenly combined. 
Pour into prepared tin and bake for 60 to 75 minutes until a thin skewer inserted in the middle comes out with just a few crumbs on it. (Two smaller cakes will bake more quickly.) Put tin or tins on a wire rack and leave cake/s to cool completely before removing. 


Cream cheese icing
80 g cream cheese, softened
45 g butter, softened
3 and 1/4 c icing sugar
1 tsp vanilla
1 Tbsp lemon juice
Passionfruit pulp to decorate
Beat cream cheese and butter together. Add icing sugar, vanilla and lemon juice and beat till smooth. Spread over top of cake and decorate with passionfruit pulp.
(If you want to cover the whole cake, make half as much icing again - this looks very pretty but again, it could be overdoing it!)
        I forgot I shouldn't use the fan and had the oven a little too hot as a result, so the cake cooked quickly, cracked a bit on top and got a slightly crunchy outside. (I made a smaller loaf cake as well.) But this actually didn't matter at all, it was a nice contrast - when we cut into the cake it was really moist and tender, perfect for dessert.  I didn't use the icing - instead I mixed together a sachet of mascarpone, some icing sugar (taste as you go - it shouldn't be too sweet), the juice of half a lemon, and pulp from another passionfruit, to serve on the side. This went perfectly with the sweet cake. We were happy as hummingbirds.


Saturday, February 22, 2014

Light and lovely lemon cheesecake

For really useful recipes, Annabelle White is always a good bet. Last weekend I wanted a light lemony dessert for dinner - for once I've got plenty of lemons, thanks to two kind friends. It had to be something I could make in the afternoon. That ruled out my fabulous lemon mousse recipe - you really need to make it the day before, or very early in the morning. It was going to be too warm an evening for lemon delicious, and a classic lemon tart would take too long.
      So of course I Googled "lemon dessert", and there were plenty. But as soon as I found AW's recipe for a lemon ricotta tart, I knew that was what I would make. It's incredibly simple and it's also relatively low-fat.
       I introduced two variations. AW uses sweet short pastry, but I thought that as it was really a kind of cheesecake, it would be nice with a biscuit-crumb-and-butter case made with gingernuts. And while she specified ricotta, I decided to try it with cottage cheese instead. It's less than half the price of ricotta, and if you beat it thoroughly and then drain it in a sieve, it usually makes a perfectly good substitute. In this case, I wouldn't even need to drain it.

Light lemon ricotta cheesecake 
(adapted from an online NZ Women's Weekly recipe by Annabelle White. I halved the recipe to make a smaller tart - double it for a larger one.)

For the crust:
1 packet gingernuts
100g butter

Spray the sides of a round loose-bottomed cake tin lightly with oil (or grease very lightly with butter). Line the tin with baking paper. It needs to be sticking up all round the base for about 5 cm.
Crush the gingernuts in a food processor, or put them in a plastic bag and bash them to fairly fine crumbs. Put them in a bowl. Melt the butter and stir it thoroughly into the crumbs.
Line the tin with the crumb mixture. Press down to ensure the bottom is even and form the excess crumbs into a nice upstanding rim all around - it will be about 3-4 cm high. Place tin in the fridge to set the base.

For the filling:
2 large eggs
250g ricotta cheese or plain cottage cheese
Zest of 1/2 a large lemon
Juice of 1 large lemon
1/4 cup caster sugar
icing sugar to dust
whipped cream or yoghurt (or a mixture of both) to serve, if desired

Preheat oven to 175C (or 165C on fan-bake).

Put ricotta in food processor. If using cottage cheese instead, beat it well in the food processor before adding the other ingredients.

Add eggs, lemon zest, juice and caster sugar. Process together, using the pulse button, until well mixed. Pour this mixture carefully into the chilled pastry case. Stand on a thin baking sheet with a little rim (in case of any leaks - if you've made the crumb crust carefully, it won't leak.)

Place in the middle of the oven. Bake for 30 minutes and check to see if filling is nicely set. If not, bake for another 5 minutes and check again. (I found this was long enough for the smaller tart. If you are doubling the recipe it will need to cook for about 40-45 minutes.)

Cool, then get the serving plate ready, remove cheesecake carefully from the tin, lift off the base and remove the baking paper. Dust with icing sugar before serving.


I served this with whipped cream, with a spoonful of yoghurt stirred in. It's a lovely light, lemony cheesecake with a restrained shallow filling, nicely offset by the ginger crust - perfect for dessert. And fantastic next day too.