Thursday, June 24, 2010

Simply soup


It hasn't been all that cold in Wellington this week, but it's been depressingly damp and gray. Time to go back to basics. The very first thing I ever made from Mastering the Art of French Cooking was leek and potato soup. It's probably the simplest recipe in the whole two volumes.

Potage Parmentier (sounds much more impressive, doesn't it)
Peel and dice enough potatoes - preferably Agria - to get 450g.
Remove the tough outer skin of fresh, not too gigantic leeks. Slice the tender pale lower parts into thin rounds. Remove the remaining tough darker green leaves near the top, and slice the inner tender light green parts thinly. You want the same weight of leeks as of potatoes, 450g.

Put the veges into a large saucepan and add 1.5 litres of water and 1 dessertspoon of salt. Simmer, partially covered, for 40 minutes or more, until the veges are tender.

What you do next depends on how smooth you want the soup to be. Julia says you can mash the veges with a  fork or pass them through a moulinette. Or you can let everything cool and whizz it in a food processor or blender, though the resulting soup is considered too smooth and homogenous by some authorities.


Correct seasoning and leave aside, uncovered, until just before serving. Reheat to simmering point.


Either stir in, a spoonful at a time, 4-6 tablespoons of cream or softened butter, or swirl a little cream around the top of each bowl as you serve it. Scatter 2-3 tablespoons finely chopped parsley or chives over the soup in a tureen, or put a little onto each bowlful. Or you could just eat it as it is. Leeks, potatoes, salt and water.

Sunday, June 20, 2010

Offally nice

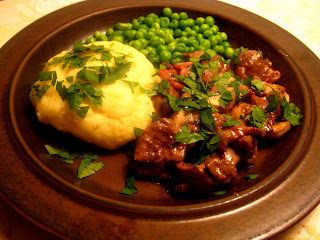
If you're one of those people who can't cope with the idea of eating any kind of offal, stop reading now. I love liver but Harvey hates it, so I don't eat it often. We're both keen on kidneys, which is good, because they're cheap, healthy (no fat), delicious, and can be very fast and easy to cook. I made up a good quick kidney dish with bacon and mushrooms recently. We had it for dinner, but it's just as good for weekend brunch. The pictures don't quite match because I've increased the quantity of ingredients to serve two normal appetites, instead of one (me) and less than half of one (Harvey).

6 lamb kidneys
3 large or more smaller rashers of happy pig bacon (Henderson's Dry-cured is good)
6 button mushrooms
2-3 shallots or 1 onion
red wine or brandy
salt and black pepper
beef stock powder
cream

Remove silver skin (if any) from kidneys and cut each into about 6 little pieces, removing the inner hard white bit. Remove stalks from mushrooms and slice. Chop onion or shallots. Cut bacon into smallish pieces.


Heat a heavy frypan and turn it down to medium or less. Gently fry the bacon to melt off some fat. Add the onions or shallots and cook gently until soft. Add the kidneys and brown them gently, turning them over often. Add the mushrooms and cook gently until softened.


Add a good slurp of either red wine or brandy and let it bubble up to reduce a little. Add salt and pepper to taste and a sprinkle of beef stock powder if you think the mixture needs it (you may prefer the milder flavour and paler colour without it). Stir in a good splash of cream and serve piping hot.

Sunday, June 13, 2010

Onion tart

If I had to give up all kinds of vegetable save one, I'd keep the onion family. I once knew a woman whose husband refused to eat onions, and she had a really hard time working out what she could cook without them.
         Last week I had a special friend coming to lunch, and decided I'd make an onion tart. It's another of those accommodating dishes that are best served warm, rather than piping hot. I used a recipe I've been making for years, from my trusty Pauper's Cookbook (that's the other good thing about onions, they cost so little and keep so well). The recipe says you can add cheese on top at the end if you like, but I think it tastes better made with just onions, eggs and cream.
          I did make my own pastry this time - with reasonable though certainly not brilliant success, so I won't even try to give a recipe for that. Commercial savoury shortcrust pastry is fine, and using ready-rolled sheets makes it easier still. But these need to be bought and used up quite quickly, so they don't turn into the ancient, brittle freezer relics mine sometimes become.
           Some of my friends swear by a ceramic dish but I prefer metal. My flan tin is good because it's got a loose bottom, but it's a bit too wide and a bit too shallow, I think I need a deeper one.
            The onions take quite a long time to soften, so if you want this for lunch or an early dinner, it pays to cook them the night before. It might work well to do them in a slow cooker, but I haven't tried this.

Alsatian onion tart (after Jocasta Innes)
4 medium or 2 large brown onions (white is better if you can find them)
30g butter (or a bit more)
2 large or 3 smaller eggs
2 tbsp plain flour
75g (1/4 of 300g bottle) cream
Savoury short-crust pastry to line a 20-25 cm flan dish or tin

* Finely slice the onions, getting rid of the tough outer skin. Cook them gently in a shallow pan over a low heat, with just enough water to stop them ctaching, until they are soft and tender and transparent. They should not brown. Stir in a generous lump of butter and leave them to stew a few minutes longer. (You can do all this ahead of time.) Leave them in the pan.
* Set oven to 220C. Defrost the pastry if necessary.
* Lightly but thoroughly butter a flan tin and line it with the pastry.
* If you cooked the onions earlier, warm them gently through, then turn off the heat. Beat the eggs and stir them into the cooked onions. Add salt, freshly ground black pepper and 1-2 tablespoons of cream.
* Spread the onion mixture evenly over the pastry, spoon a little more cream evenly over the top, and bake for 20 minutes at 220C. Turn the heat down to 180C and cook for another 25-30 minutes, until the pastry edges look golden brown and crisp and the filling is golden and nicely set.
* Leave the flan to cool a little. If possible remove it from the tin and transfer it to a warm plate for serving, otherwise serve it from its dish.
This goes well with either a warm green bean salad or a plain green salad with a slightly sweetish vinaigrette dressing, and some crusty bread.

Thursday, June 10, 2010

Keeping an eye on the cheese

I know there are hundreds of much more important issues to deal with, but I constantly see wordings that really annoy me. Often I try to say something, don't put it very well, lose my cool and achieve absolutely nothing. But this week was different.
            A wonderful new deli, Gamboni's, recently opened in Karori's Parkvale Road. It stocks a great selection of fresh, cut-to-order cheeses. But when I went in to have a look, the first thing I saw was a blackboard sign on the cheese counter that said, "A meal without cheese is like a beautiful woman with only one eye."
             I want to use this shop, I thought, but that's going to drive me away. The customers tend to be predominantly women. This saying wasn't created for them (except maybe to remind them that they'd better buy cheese for their man's dinner, and be quick about it). It was devised by a man for other men (in the long and unedifying tradition of lining up women with food). So I spoke nicely to the very charming proprietor, Tony Gamboni.
             "It's an old French saying", he said. "I'm sure it is", I said, "but I'd really like to see it say, 'A meal without cheese is like a handsome man with only one eye.' Just for a change." "Okay", he said, "I'll fix it".
             And he did. The next time I came in, the sign said "A meal without cheese is like a beautiful woman (or a handsome man) with only one eye."  Brilliant. And by the way, his cheese, and his freshly cut salami, are fantastic. Here's the Gorgonzola Dolce, fresh in today, and wonderful with ripe pears.

Sunday, June 6, 2010

Fun with fudge

About the first thing I ever tried to make was chocolate fudge. Ever since I'd been old enough to go to school fairs by myself, I'd loved buying little cellophane packets of it. When it was good - not too sugary or too hard, no crystals, just pure smooth melt-in-the-mouth chocolateyness all through - it was sensational.
         At high school I made it with a friend at her place - she was an expert. But the first, second and third times I tried it at home, the wretched stuff would never set properly. It still tasted good, but I had to eat it with a spoon. So, as I tended to do whenever I encountered anything that I couldn't master, I gave up trying. After all, I couldn't cook anything else, so why should I be able to cook fudge?
         In fact fudge is just not that easy to get right, unless you happen to have a confectionery thermometer. It's also not that safe, since it involves coping with a whole pot of boiling sugar.  Heaven knows why it's supposed to be something really suitable for children to make.
          But one of the things I've decided to do this year is go back to recipes that I've tried unsuccessfully to make in the past, and see if I can get them right, now that I'm a lot older and definitely a bit wiser, at least in terms of cooking. We had a fudge-respondent friend coming for dinner on Friday, so that afternoon, once I had the venison casserole in the oven, I set about making plain chocolate fudge, using a basic recipe devised for Kiwi kids, for "afters". Here's the recipe, with notes of what happened.

Chocolate fudge
(Adapted from recipe by “Boris” for Kiwiwise)
2 cups sugar
25g butter
1/2 cup milk
1 tablespoon cocoa (I used "dutched" cocoa)
1/8 teaspoon vanilla essence (I slurped in just a little more)

* Lightly butter a tin – a shallow loaf tin is good. It should be the right size to give you a good thick layer of fudge, rather than a thin one.
* Combine all the ingredients, except vanilla essence, in a saucepan, preferably with a heavy base.
The one I used had a good copper base and a double pouring lip, but turned out to be a bit too small – you need to allow enough depth for the boiling fudge to stay well below the rim.
* Gently bring to a light boil. Set the heat low enough to keep the fudge at a light boil for about 20 minutes, stirring occasionally with a wooden spoon.
I have a gas hob, and I think this was partly why I had problems in the past too. Even on a modern hob, using the smallest burner on the lowest setting, I found the mix kept trying to boil over the top of the pan (see above). So I had to keep moving it aside, waiting for it go down, then putting it back. I tried using one of those metal simmer plates, but that slowed it down too much. So I boiled it for an extra 5 minutes, to allow for all this toing and froing.
* Start testing the fudge by dropping a little into a glass of cold water. When it forms a soft ball, instead of just streaming down to the bottom, then it’s ready.
This is the part that used to baffle me. But you can sort of see when it’s reached this stage by the way it drips off the spoon, in solid round drops rather than a little stream, and then it does make a little ball in the water, sort of, though it still plummets to the bottom - somehow I had always imagined it would float.
* Remove from the heat, add vanilla, and beat until thick. Pour into prepared tin and leave to set.
You can use a hand beater, as I did in the past, but it's really hard work, and I probably gave up too soon. This time I did panic mildly, thinking I hadn't cooked it long enough - I'd forgotten how long it took to get thick - but with an electric beater it was much easier. Even so, it needs beating for quite a while, maybe 10 minutes, until it’s obviously getting really thick. Then it's a race to get it into the tin before it congeals. My tin was a bit too large, so I tried to sort of push it back to form a thicker layer. Then I tried to get the rest of the rapidly setting panful out, and spoilt the lovely smooth shiny top the fudge in the tin had when I first poured it.
* Once it’s set, cut in careful lines, using one steady cut, with a knife heated under the hot tap.


Yes, well. It took at least 3 hours to set properly, and even then the middle pieces were still a bit soft. Unlike my mother I have anything but a "straight eye", so the pieces ended up neither square nor even. But I consoled myself by eating all the by now well-hardened scraps out of the pan and off the beaters. It was definitely a success at dinner - even Harvey had a bit. And as you can see, mine looks no messier, and if anything a bit better, than the fudge on the website (below). Next time I'll try Russian fudge.

Wednesday, June 2, 2010

The children's turn to cook

When it came to teaching my boys to cook, I fell sadly short. I had never learned to cook from my own mother – I literally couldn’t boil an egg. But I was a girl, and inevitably (this was the 1960s) it wasn’t long before cooking caught up with me. As a very young (19) new wife, I simply assumed it was my job to provide our meals. If I’d been able to consult (surreptitiously, of course) Margaret Brooker’s excellent cookbook for children, It’s My Turn to Cook, I would have learnt the basics a lot faster. And my children would have benefited greatly from it too.
         It’s not just me singing her book’s praises. Last month it beat five other finalists to carry off the Golden Ladle for Best Children’s Cookbook at the prestigious seventh Le Cordon Bleu World Food Media Awards.  But she didn’t do it alone. Here’s her delightful tribute on the first page to her co-authors, aged 10 and 8 when the book was published:
          “As my child consultants, advisors, peer reviewers and recipe testers, my daughters Alexandra and Charlotte have been key in the writing of this book. Much as they enjoyed the cooking, and the eating, there were times when they would rather have been playing than donning aprons to test yet another recipe. I thank them profoundly for their goodwill, sound sense and perseverance.”
           Most children’s cookbooks rely heavily on snacks and treats. There are sections on snacks and sweet things here too (and cookies do feature on the cover). But what I like most about the 40 recipes in this book is their focus on real meals, from breakfast and lunch to dinner and side dishes: pancakes and French toast, Tuscan vegetable soup, kedgeree, Moroccan lamb, roast chicken, broccoli cheese – and baked beans with sausages.
           When I talked to Margaret, she said this was important. She believes very strongly in children sitting down to eat with adults, not eating separate “dumbed-down” meals by themselves, and learning to cook not just now and then for themselves and their friends, but for the whole family.
           The skills involved – such as grating, chopping onions, cooking rice, separating eggs – are simply and clearly explained, with pictures. What’s more, all the equipment used is very basic (and cheap). No food processors, electric beaters or microwaves. The ingredients are basic too. There’s also a great section on food safety – in her other life, Margaret is a lawyer with the Food Safety Authority.
            Margaret sees cooking skills as essential for everyone. “I’ve heard of people giving the book to their teenagers when they go flatting. And I was told about an elderly man who used it when he needed to learn to cook for himself.”
             But she also understands children. So the section at the beginning called “Why cook?” highlights the fun and pleasure, popularity and pride, that comes from knowing how to cook well.

It’s My Turn to Cook
Margaret Brooker, with Alexandra & Charlotte Stephen
Photography by Paul McCredie
New Holland, 2007, large hardback, $24.99