Showing posts with label lemons. Show all posts

Saturday, February 22, 2014

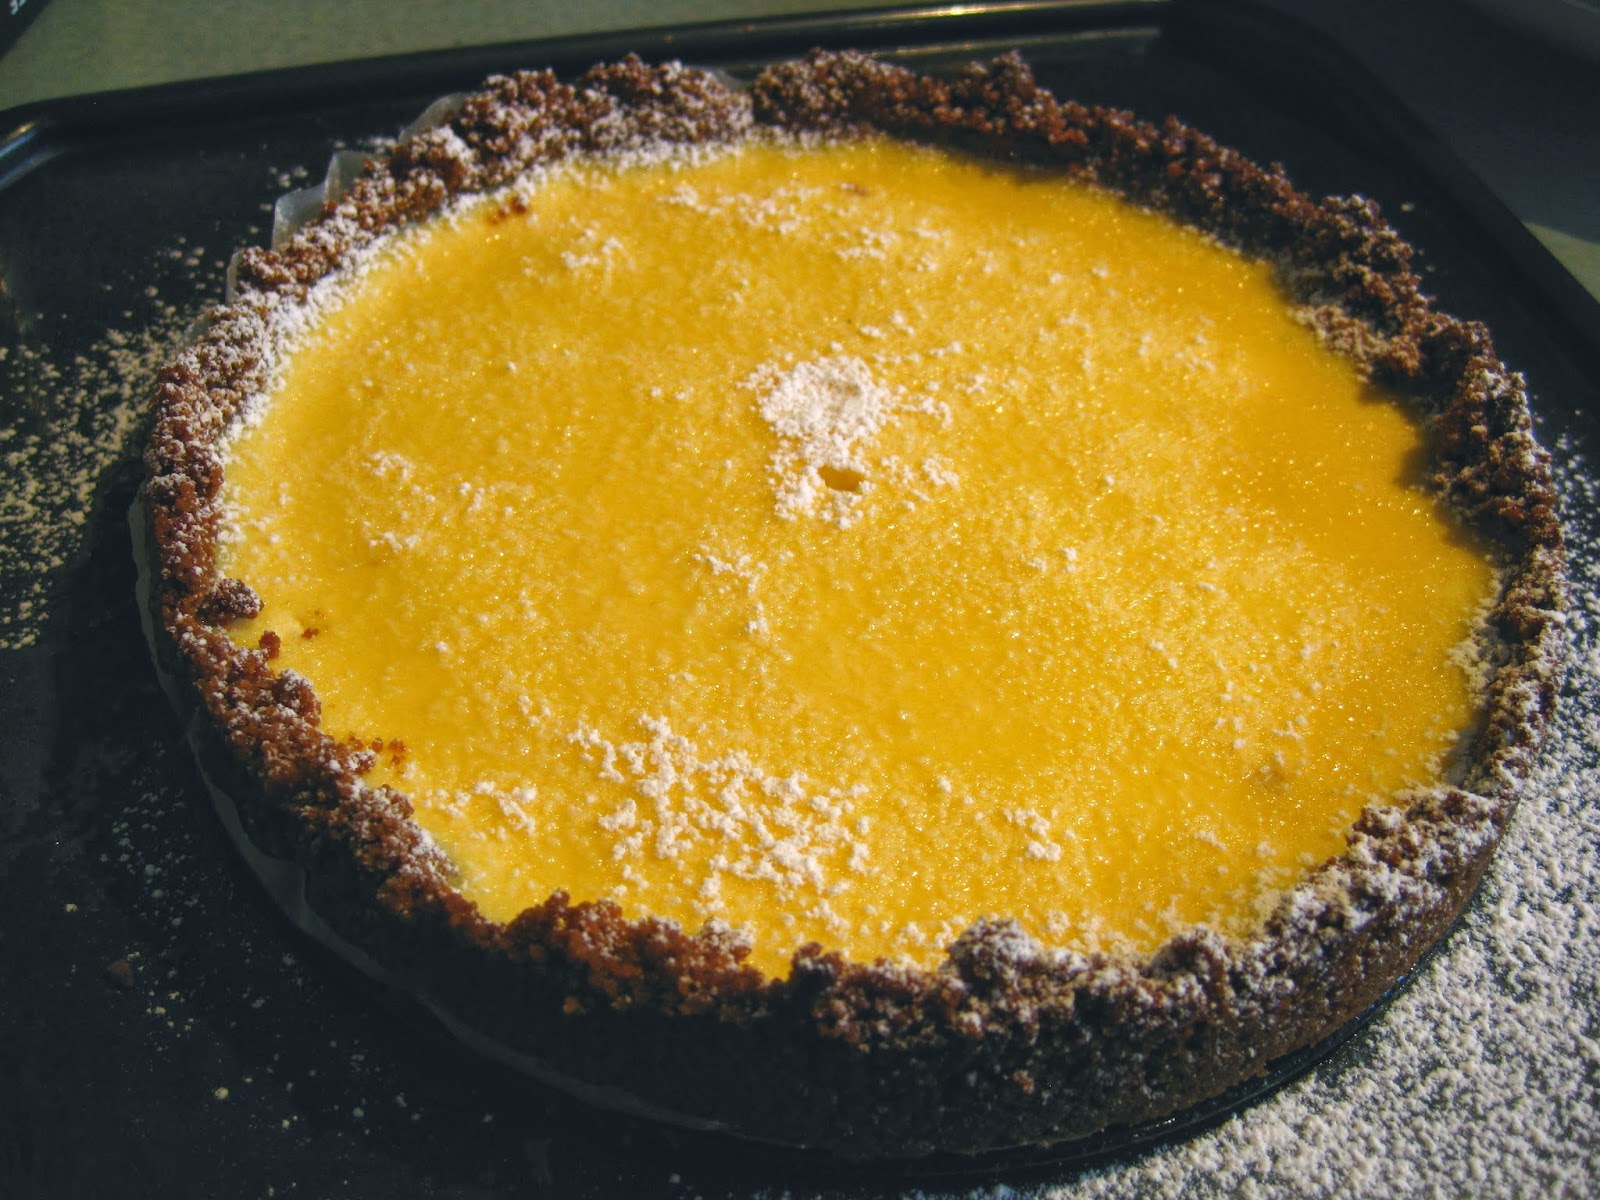
Light and lovely lemon cheesecake

For really useful recipes, Annabelle White is always a good bet. Last weekend I wanted a light lemony dessert for dinner - for once I've got plenty of lemons, thanks to two kind friends. It had to be something I could make in the afternoon. That ruled out my fabulous lemon mousse recipe - you really need to make it the day before, or very early in the morning. It was going to be too warm an evening for lemon delicious, and a classic lemon tart would take too long.
      So of course I Googled "lemon dessert", and there were plenty. But as soon as I found AW's recipe for a lemon ricotta tart, I knew that was what I would make. It's incredibly simple and it's also relatively low-fat.
       I introduced two variations. AW uses sweet short pastry, but I thought that as it was really a kind of cheesecake, it would be nice with a biscuit-crumb-and-butter case made with gingernuts. And while she specified ricotta, I decided to try it with cottage cheese instead. It's less than half the price of ricotta, and if you beat it thoroughly and then drain it in a sieve, it usually makes a perfectly good substitute. In this case, I wouldn't even need to drain it.

Light lemon ricotta cheesecake 
(adapted from an online NZ Women's Weekly recipe by Annabelle White. I halved the recipe to make a smaller tart - double it for a larger one.)

For the crust:
1 packet gingernuts
100g butter

Spray the sides of a round loose-bottomed cake tin lightly with oil (or grease very lightly with butter). Line the tin with baking paper. It needs to be sticking up all round the base for about 5 cm.
Crush the gingernuts in a food processor, or put them in a plastic bag and bash them to fairly fine crumbs. Put them in a bowl. Melt the butter and stir it thoroughly into the crumbs.
Line the tin with the crumb mixture. Press down to ensure the bottom is even and form the excess crumbs into a nice upstanding rim all around - it will be about 3-4 cm high. Place tin in the fridge to set the base.

For the filling:
2 large eggs
250g ricotta cheese or plain cottage cheese
Zest of 1/2 a large lemon
Juice of 1 large lemon
1/4 cup caster sugar
icing sugar to dust
whipped cream or yoghurt (or a mixture of both) to serve, if desired

Preheat oven to 175C (or 165C on fan-bake).

Put ricotta in food processor. If using cottage cheese instead, beat it well in the food processor before adding the other ingredients.

Add eggs, lemon zest, juice and caster sugar. Process together, using the pulse button, until well mixed. Pour this mixture carefully into the chilled pastry case. Stand on a thin baking sheet with a little rim (in case of any leaks - if you've made the crumb crust carefully, it won't leak.)

Place in the middle of the oven. Bake for 30 minutes and check to see if filling is nicely set. If not, bake for another 5 minutes and check again. (I found this was long enough for the smaller tart. If you are doubling the recipe it will need to cook for about 40-45 minutes.)

Cool, then get the serving plate ready, remove cheesecake carefully from the tin, lift off the base and remove the baking paper. Dust with icing sugar before serving.


I served this with whipped cream, with a spoonful of yoghurt stirred in. It's a lovely light, lemony cheesecake with a restrained shallow filling, nicely offset by the ginger crust - perfect for dessert. And fantastic next day too.


Friday, January 6, 2012

Pollo play

Not having cooked many proper dinners since before Christmas, I was very happy to have friends coming for dinner this week. As I'm off to China on Monday, and want to leave at least a scrap of room in the freezer for my housesitter, I decided it would be a good chance to use what I had instead of going shopping. When free range chickens were on special a while ago I cut two up and froze the pieces. But I needed a recipe that involved some kind of marinade, because even when it's fresh, chicken can taste a bit boring.
       
What I came up with was a combination of two recipes from my oldest Italian cookbook, Ada Boni's venerable Talisman, organised so as not to use any flour (one of my friends doesn't eat gluten).
         The marinade was from her Pollo frito alla Fiorentina, Florentine fried chicken with lemon and parsley. But the cooking was from her Pollo alla cacciatora, Hunter's chicken, which also uses parsley, as well as onion, garlic , celery and white wine - but no tomatoes, unlike most other versions of hunter's chicken I've seen.

Pollo alla Karori (with homage to Ada Boni)

Chicken pieces, trimmed of loose fatty bits and loose bits of skin (4 drumsticks and 4 thighs, all with skin on, is a good combination for 4 people)

For the marinade:
2 Tbsp olive oil
4 Tbsp lemon juice (I used the salty juice from a jar of my preserved lemons)
salt and pepper (I didn't need any more salt)
2 tsp finely chopped Italian flat-leaved parsley
Mix well and cover the chicken pieces with this marinade. Leave for at least 2 hours before cooking.

For the sauce and cooking:
Olive oil for frying
1 small onion, finely chopped
2 cloves garlic, finely chopped
3 tender sticks celery, or a bunch of lovage leaves and stalks (this gives the flavour without any stringy bits)
2-3 sprigs flat-leaved parsley
salt and pepper
150 ml dry white wine

- Set oven to 180C, fan forced, or 190 without fan. Take chicken pieces out of marinade, shake well and pat them a little with paper towel to dry them slightly. Then, as Ada puts it, "Place in frying pan some olive oil" - or better, use a pan that can also go in the oven.  Fry the pieces in two batches until they are thoroughly browned on all sides. Remove and keep warm.
- Add a little more oil and gently fry the onion, garlic, celery and parsley until soft. Add white wine. Cook for a few minutes to reduce a little, then add the remaining marinade. Check seasoning and add more salt and pepper if necessary.
- Add chicken pieces, put pan in oven uncovered, and bake until chicken is tender and cooked right through, but not dried out - about 35-45 minutes, depending on your oven and how large the pieces are. Baste chicken pieces with the sauce twice during cooking.
- Remove pieces and keep warm while you degrease the sauce - I carefully place a double-folded piece of thick paper towel on the surface to absorb the excess fat, doing it twice if necessary. If there is too much sauce or it seems too thin, reduce it a little on the hob. Check seasoning again


You can either put the chicken pieces back in the sauce, or serve the sauce separately, along with whatever kind of potatoes you prefer. I baked small red-skinned golden-hearted potatoes in a separate roasting tin on a lower shelf while the chicken was cooking - all they needed was a  little oil and salt. We had pieces of preserved lemon with this, and a green salad, with a pinot gris. The light, summery celery/parsley/lemon flavours were a great success (she said modestly). Look for the next post (China!) in late January.

Thursday, December 1, 2011

Strawberries and salted lemons


My friend Jane P. brought me this clever strawberry huller from New York, and it works brilliantly. Last Saturday I hulled a whole lot of luscious little red critters ready to cut in half and steep in bitter orange liqueur for dessert.


But three of them - one each - were enormous, and deserved a different fate. I'd already taken their stalks out, so I couldn't easily dip their pointy ends in melted chocolate. Instead I used the chocolate to fill the holes in their tops. Not only do they look good, but you get more chocolate this way.


This week called for sterner stuff. Today I went to a friend's for lunch (my boursin with her French bread, a lovely light orange and chicken salad, strawberries, and her firmish, superbly chewy/melty brownies), to get our strength up for the afternoon's task: preserving lemons.
      I'm very keen on preserved lemons, but they're very expensive to buy, and often the bought ones have vinegar added, which is not good. They're one of the few preserves I'm happy to make. All you do is:
- Collect jars with lids - the mouths should be wide enough to push in a whole smallish lemon, and you'll want the jars big enough to get in around six lemons each - and put them and their lids through a hot dishwash cycle while you prepare the lemons. Make sure to keep the jars and lids matched.
- Get hold of enough smallish, firm, evenly yellow lemons (our Karori New World had really good ones this week, but they're even better fresh from the tree, if you've got one - mine is bravely struggling to survive).
- Either collect enough big juicy easy-to-squeeze lemons for juice to fill your jars, or cheat (as we did) and buy freshly squeezed lemon juice by the litre.
- Have ready about half a cup of salt for each jar, and enough olive oil to put a very thin layer over the top of each jar.
- Take off the stems and stem ends and cut the lemons almost in half lengthwise through the pointy end, then almost in half again the other way (so you get four quarters, still joined at the stem end)
- Put all the salt in a deep bowl and push each cut lemon into it, so that the salt goes up inside and more or less evenly coats each cut surface.
- Shake out any excess, or scrape it out with a teaspoon. (Of course if you're meant to be on a low-salt diet, you shouldn't make or eat these at all.)
- Push the lemons as tightly as possible into the jars - you can split some up into halves or quarters to fill awkward side gaps.
- Fill the jars carefully with juice, almost to the top. (My friend Ali says that instead, if you're patient, you can leave the jars in the pantry (not the fridge - see second comment below) and within a few days the lemons will have made lots of juice of their own, so then you just need to top the jars up - but we weren't patient.)
- Pour a very thin layer of olive oil over the top of each jar.
- Wipe the rims to get rid of salt, put the lids on, and tighten them.
- Leave the jars for at least four weeks. Once they've been opened, store them in the fridge.
- Eat the lemon skins (you're supposed to discard the flesh, but I often don't bother, I just eat that too) with grilled chicken, steak, chops, or fish, or use in salads. The salty lemony oily juice is delicious used sparingly in salad dressings or Middle Eastern stews or couscous. 
     Some recipes say you can use brine instead of juice, but this doesn't really work, they don't taste nearly as good. Our jars didn't look beautiful because the lemon juice was cloudy, not clear, and we weren't aiming for A & P prize quality, but I'm sure they'll taste fine.  


Thursday, June 9, 2011

Such a simple lemon cake...

Now this post will probably be of no use to all those savvy readers who've been making this cake ever since they could first say "Alison Holst". But as I thought there just might be someone out there who hadn't heard about it, and it's the only cake I set out to make that never, ever goes wrong, I thought it would be worth writing about. I got some free lemons from my friends from Linton, and I needed something to serve as dessert, so I made it for Monday night. I originally got the recipe from Ali, but she says it's really from the other Alison. The ingredients are listed in the order you use them.

Lemon Yoghurt Cake

1 and 3/4 cups sugar (I cut this down a little to 1 and 1/2)
rind of two medium lemons
2 eggs
1 cup oil
1/2 tsp salt
1 cup yoghurt (any kind, plain or sweetened, though of course lemon is good - but more expensive)
2 to 3 tbsp lemon juice
2 cups self-raising flour

Set oven to 180C. Grease and flour cake tin - a ring tin with baking paper on the bottom works well. Or else just put baking paper into a square tin.
Put sugar and lemon rind into food processor bowl. Process until completely combined.
Add eggs, oil and salt. Process until thick and smooth.
Add yoghurt and lemon juice and process to mix.
Add flour and process briefly, just to combine.


Pour into tin and bake at 180C for about 40 minutes, until a skewer inserted in the middle comes out clean. (A square tin may take a bit longer.) Cool for 10 minutes before removing from tin.
Serve with icing sugar sieved over the top, and/or either whipped cream or plain or lemon yoghurt or lemon sorbet.


As you can see, it's still a tiny bit damp at the bottom - I was in a hurry and took it out of the oven slightly too soon - but as it was for dessert, that didn't matter in the slightest. I served it with a quick syrup made from lemon curd heated up with a little juice and water.

Thursday, July 22, 2010

Lemon bliss

In her short story "The Garden-Party", Katherine Mansfield wrote of two sisters eating cream puffs "with that absorbed inward look that comes only from whipped cream". It's even better if it's on top of a slice of lemon meringue pie.
         We never had it at home, and when I first made it, I didn't understand that you were supposed to leave it until it was cold. So I cut it too soon, and the lemon filling oozed out all over the plate.
          It's one of Harvey's favourite desserts, and soon after he came to live with me, he bravely set about making it one Saturday. He made quite a good job of it, and when his fellow bureaucrats asked him what he'd done in the weekend, he said proudly, "I made a lemon meringue pie." "Why?" they said. "Can't Anne cook?"

For years I used Nancy Spain's recipe. The only problem is that it's designed for rather a small dish. So this time I went on-line and found a recipe on NZChef that's almost exactly the same, but with one more egg and a little more of everything else, so it neatly fits a 23cm fluted tin.

Lemon Meringue Pie
550g (or two sheets) sweet shortcrust pastry (bought, I'm afraid - I'm still working on finding the perfect recipe and technique for homemade)
juice and zest of 3 large lemons
60g cornflour (the recipe says 65g but that seemed to be slightly too much)
75g caster sugar
4 large eggs, separated
another 200g caster sugar

Shell:
*Preheat oven to 190C. Butter the tin very lightly but thoroughly. (Mine has a removable base, which is useful.)
*Either defrost or roll out the pastry. Line the tin carefully, making sure there are no holes or cracks. Chill in the fridge for 30 minutes. (if you don't, the sides shrink down when it cooks.)
*Blind bake the pastry until cooked and lightly golden, about 25 minutes. (I have those ceramic baking beads, so I use them on top of a circle of baking paper. But what I've never quite figured out is how you're supposed to remove them without doing any damage to the pie shell - especially as it's best to take them and the paper out ahead of time and put the hot shell back to finish baking. All suggestions gratefully received!)
(PS: See Grizabella's comment - she says use a square of paper with the corners sticking up, so you can easily lift it out with the beans or beads in it afterwards. Excellent, thank you!)

Filling:
*Place lemon zest in a medium saucepan with 600ml water. Bring to the boil, remove pan from heat, and leave to stand for 30 minutes.
*Blend cornflour with a little lemon zest liquid in a bowl to make a smooth paste. Add to pan of zest and water, add lemon juice, and stir well. Bring mixture back to the boil, stirring continuously. Reduce heat and cook, stirring, until it's thickened.


*Remove pan from heat, leave to cool a little, and stir in the 75g sugar. Taste it to see if the balance of sweetness and lemon is what you want - if not, add either more sugar or more lemon juice. It should be quite sharp, to contrast with the sweet meringue.

*Add egg yolks and mix in thoroughly to combine. Set aside while you make the meringue.

Meringue:
Whisk egg whites until stiff. Gradually whisk in the 200g sugar until the meringue is very stiff and shiny.


*Set oven to 100C. This recipe says 190C, but I prefer a crisp meringue, not a soft one, and for that I think it works better to bake the whole thing at no more than 100C.

*Place tin with pastry shell onto a baking sheet (easier to handle). Carefully pour in the filling. Spread the meringue over the top so that no filling shows, and gently fork it into little peaks or ridges all over. Bake until the meringue is just very lightly coloured, about 30 minutes or more (but watch it). Leave to cool before serving.


And after that opening, I forgot to take a photo of a slice with cream! But here's the last (slightly soggy) bit, just before I ate it for breakfast next day.