Showing posts with label dessert. Show all posts

Thursday, April 26, 2012

Fit for a goddess

I've been in Auckland visiting friends and family.  I'm lucky - everywhere I stayed, we had lovely food.

I envy my sister's organisation and efficiency. We all went out Saturday morning and got home quite late.

No problem - she took a home-made pizza from the freezer, popped it in the oven, tossed together a salad, produced a fat round loaf from Farro Fresh, et voila - a great lunch.


I had my neighbour in for dinner before I flew off. Thinking about dessert, I suddenly remembered that I had two Black Boy peaches in the fridge - they'd been hard when I bought them, so I stowed them away for later. They have a very short season (probably over for this year, look out for them next March). For the last wedding anniversary dinner I had with Harvey in March 2010, I'd used them to make a dessert from the Les Mimosas cookbook he'd bought me a few years back. 


It was written by two New Zealanders who "followed their dream", buying a nineteenth century house in Languedoc and turning it into a guest house serving "good, honest cuisine". (My first reaction when I read about people like this is always pure envy - then I think of all the hard work.) It's a lovely book, arranged by seasons. 

The recipe calls for "peches de vigne" - pink-skinned, white-fleshed peaches which grow in vineyards (and are known locally as "les tétons de Vénus" - Venus's nipples). But The Eco Gardener, a blog written by my old friend Christine Dann, says that a red-fleshed form of the vineyard peach, which seems to be much the same as the Black Boy, "has been commercialised in Soucieu-en-Jarest, the self-styled capital of the Peche de Vigne". So perhaps I'm using a true vineyard peach after all. She also says that the name "Black Boy" seems to be a totally New Zealand thing, and New Zealand is the current world capital for this variety.  

Peaches poached in muscat
4 ripe but firm Black Boy peaches, washed and dried
250 ml water
200g white sugar (the recipe says 250g but I find this a bit too sweet)
1 split vanilla pod (I used vanilla paste instead)
juice of 1 lemon
1 fresh bay leaf
150ml muscat wine (or another good dessert wine)
(the original recipe also has star anise, but I intensely dislike aniseed flavour, so I leave this out)

- Combine the water and sugar in a large saucepan and bring to the boil, stirring so that all the sugar dissolves.
- Add the vanilla, lemon juice, bay leaf, and 100ml of the muscat.Then add the peaches and adjust the heat so that the liquid is gently simmering. Depending on the size of the peaches, they will take about 20 minutes to cook. (I found I had to turn the peaches so as to make sure they were evenly cooked.)
- Carefully lift the peaches out of the syrup with a slotted spoon. Put aside to cool.


- Continue to reduce the syrup, raising the heat, until the liquid has reduced by two-thirds (be careful not to reduce it too much). 
- Stir in the last 50ml of muscat. Sieve the liquid into a jug and leave it to cool.
- When the peaches are cool, carefully remove their skins - they should slide off easily.
- Either slice the peaches in half and remove the stones, or leave them whole. Place two halves or a whole peach in each shallow dessert bowl or plate and pour the syrup over. Serve with a small glass of lightly chilled muscat or dessert wine. The colour is astonshing and the flavour is - Venusian.


Thursday, March 8, 2012

Nothing but apricots

For lunch with friends on Saturday, I wanted a light dessert to follow the antipasti, beef and cheese. I can't remember when I first made apricot suedoise, but it must have been close to twenty years ago. I found it in my ancient paperback of Cordon Bleu Desserts and Puddings, by Rosemary Hume and Muriel Downes, published in 1975 [not 1875 as I mistakenly typed when I posted this!]. It's an invaluable source of classic recipes, and you can still buy the Penguin paperback online.

What I like about this recipe, apart from being able to make it a day in advance, is that the ingredients are so simple - basically just apricots, plus sugar, gelatine and a little lemon juice. I used big firm Otago apricots - they would have been even better if they'd been just a little riper, but because you cook them, it doesn't really matter. The only variation from the original recipe is that I leave out the almonds that are meant to go in the poached fruit halves - they look pretty, but I don't think their hard little intrusion is a good idea. I've also translated the measurements into metric.


Apricot Suedoise (there should be an acute accent over the e, but that's hard to do on my computer)
~ Halve and remove stones from 1 kg fresh apricots.
~ Make a sugar syrup by boiling 350ml water with 170g sugar and a strip of lemon peel in a medium saucepan. Remove the peel.
~ Cook the fruit in two batches. Choose the eight best halves and place them rounded side down, cut side up in the syrup. Bring it slowly back to a very gentle boil and cook until tender, but still retaining their shape.
~ Lift these halves out carefully with a slotted spoon and place them (I prefer rounded side down, but it's up to you) evenly round the bottom of a metal ring tin.


~ Cook the rest of the fruit until very tender. Cool a little and reduce fruit and syrup to a puree in either a food processor or a blender.
~ Extract the juice from 1/2 a large lemon or a whole small lemon. Put it in a small metal bowl and make it up to 5 tablespoons with water. Soak 2 tablespoons of powdered gelatine in this mixture. Hold the bowl over simmering water and stir to dissolve the gelatine. Stir it thoroughly into the puree (I just whizz it all up again briefly).


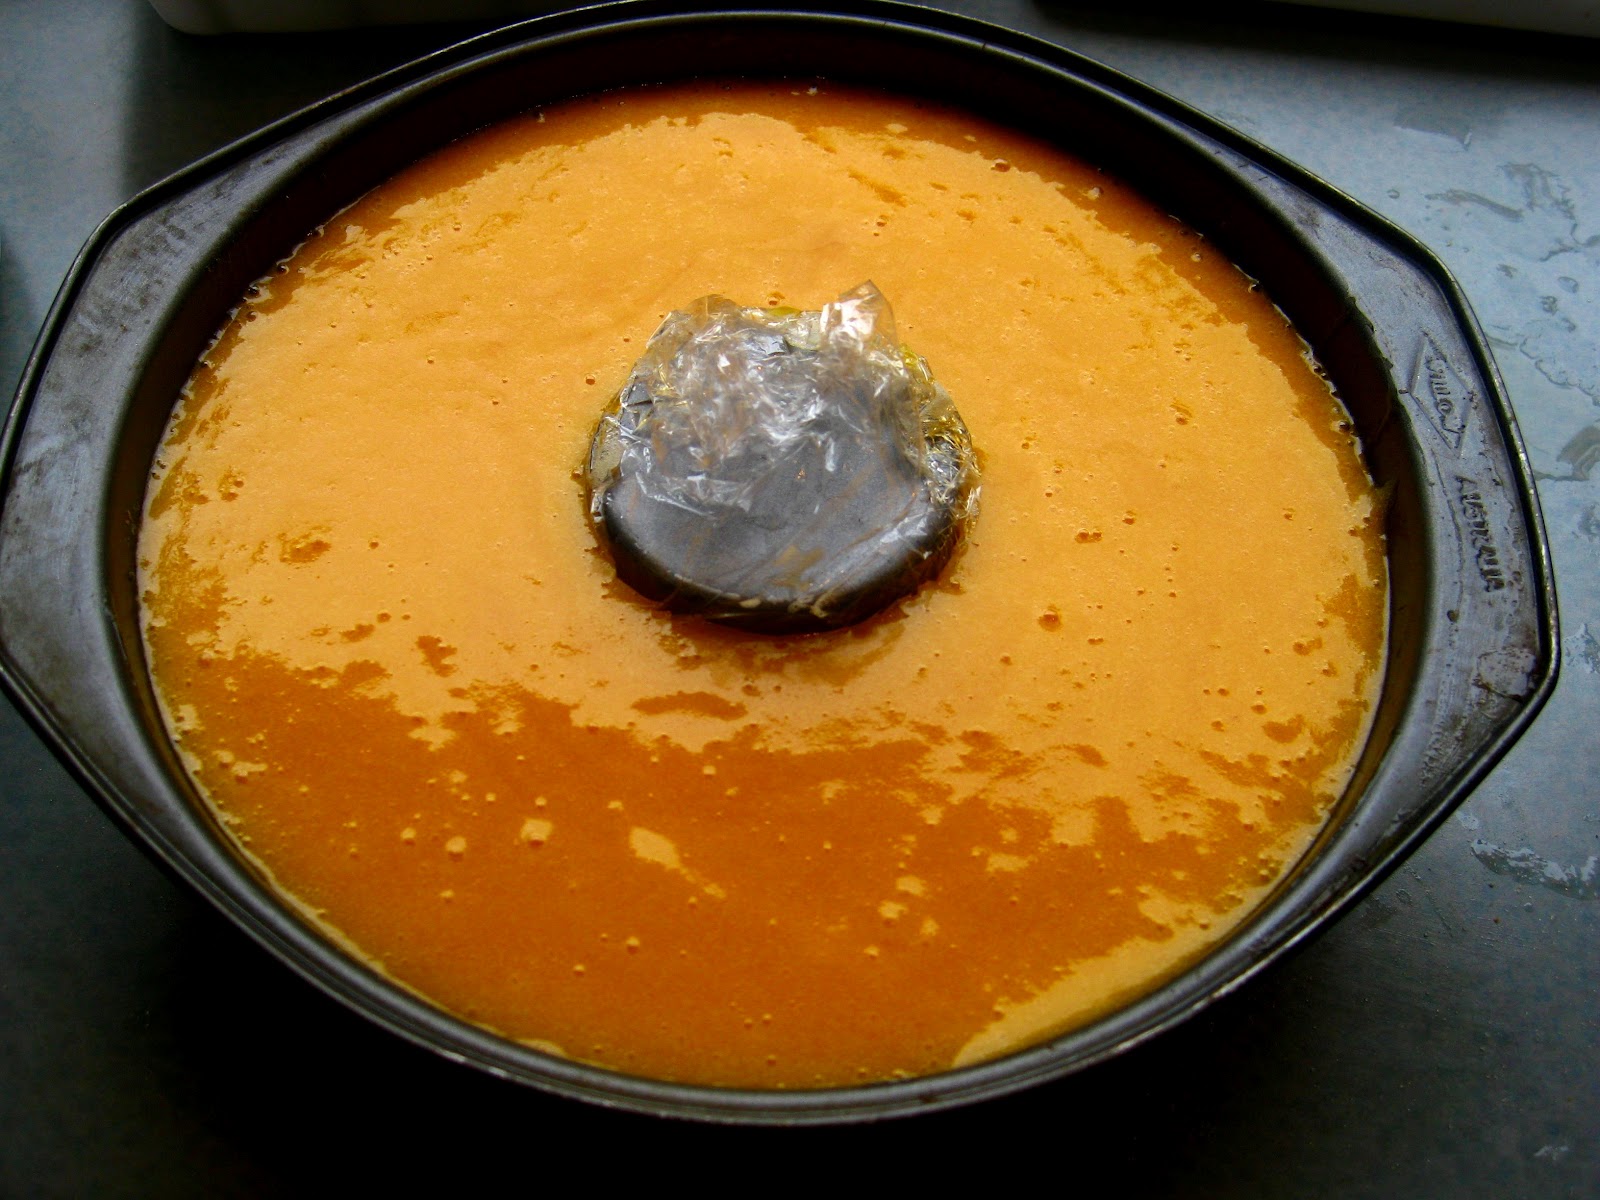
~ Pour the puree into a glass jug (if you've used a processor) and leave it to cool. When it looks as if it's starting to set, pour it carefully over the apricot halves to almost fill the ring tin. (I tried putting clingwrap round the centre bit first, so it would come out more easily - it sort of worked.)


~Cover with clingwrap and leave to set in the fridge. (You could probably get away with making this in the early morning, but it's easier to do it the day, or night, before.)
~ Take it out of the fridge about an hour before you want to serve it. Just before serving, twirl the tin carefully in a sink of hot water, then put a big plate over it and upend it. With a bit of tapping on the base, it should come out cleanly.


If you like, you can fill the space in the middle with something - cream, yoghurt, chopped fresh apricots (maybe soaked in brandy and sugar for a bit), strawberries, even flowers. Or not.  (Mine is filled with the bit of clingwrap, which I forgot to take out before I took the photo.) The main point is the incredibly intense apricot flavour of the suedoise, which I think is perfect all by itself.


Thursday, July 22, 2010

Lemon bliss

In her short story "The Garden-Party", Katherine Mansfield wrote of two sisters eating cream puffs "with that absorbed inward look that comes only from whipped cream". It's even better if it's on top of a slice of lemon meringue pie.
         We never had it at home, and when I first made it, I didn't understand that you were supposed to leave it until it was cold. So I cut it too soon, and the lemon filling oozed out all over the plate.
          It's one of Harvey's favourite desserts, and soon after he came to live with me, he bravely set about making it one Saturday. He made quite a good job of it, and when his fellow bureaucrats asked him what he'd done in the weekend, he said proudly, "I made a lemon meringue pie." "Why?" they said. "Can't Anne cook?"

For years I used Nancy Spain's recipe. The only problem is that it's designed for rather a small dish. So this time I went on-line and found a recipe on NZChef that's almost exactly the same, but with one more egg and a little more of everything else, so it neatly fits a 23cm fluted tin.

Lemon Meringue Pie
550g (or two sheets) sweet shortcrust pastry (bought, I'm afraid - I'm still working on finding the perfect recipe and technique for homemade)
juice and zest of 3 large lemons
60g cornflour (the recipe says 65g but that seemed to be slightly too much)
75g caster sugar
4 large eggs, separated
another 200g caster sugar

Shell:
*Preheat oven to 190C. Butter the tin very lightly but thoroughly. (Mine has a removable base, which is useful.)
*Either defrost or roll out the pastry. Line the tin carefully, making sure there are no holes or cracks. Chill in the fridge for 30 minutes. (if you don't, the sides shrink down when it cooks.)
*Blind bake the pastry until cooked and lightly golden, about 25 minutes. (I have those ceramic baking beads, so I use them on top of a circle of baking paper. But what I've never quite figured out is how you're supposed to remove them without doing any damage to the pie shell - especially as it's best to take them and the paper out ahead of time and put the hot shell back to finish baking. All suggestions gratefully received!)
(PS: See Grizabella's comment - she says use a square of paper with the corners sticking up, so you can easily lift it out with the beans or beads in it afterwards. Excellent, thank you!)

Filling:
*Place lemon zest in a medium saucepan with 600ml water. Bring to the boil, remove pan from heat, and leave to stand for 30 minutes.
*Blend cornflour with a little lemon zest liquid in a bowl to make a smooth paste. Add to pan of zest and water, add lemon juice, and stir well. Bring mixture back to the boil, stirring continuously. Reduce heat and cook, stirring, until it's thickened.


*Remove pan from heat, leave to cool a little, and stir in the 75g sugar. Taste it to see if the balance of sweetness and lemon is what you want - if not, add either more sugar or more lemon juice. It should be quite sharp, to contrast with the sweet meringue.

*Add egg yolks and mix in thoroughly to combine. Set aside while you make the meringue.

Meringue:
Whisk egg whites until stiff. Gradually whisk in the 200g sugar until the meringue is very stiff and shiny.


*Set oven to 100C. This recipe says 190C, but I prefer a crisp meringue, not a soft one, and for that I think it works better to bake the whole thing at no more than 100C.

*Place tin with pastry shell onto a baking sheet (easier to handle). Carefully pour in the filling. Spread the meringue over the top so that no filling shows, and gently fork it into little peaks or ridges all over. Bake until the meringue is just very lightly coloured, about 30 minutes or more (but watch it). Leave to cool before serving.


And after that opening, I forgot to take a photo of a slice with cream! But here's the last (slightly soggy) bit, just before I ate it for breakfast next day.

Monday, May 10, 2010

Hunting humble apple crumble

I don't normally use a recipe for apple crumble, I just guess. But wanting to make a really good one for a weekend visitor, I decided to hunt for guidance on the web.
      As you might expect, apple crumble must be one of the most-posted NZ recipes. What surprised me was how different they all are - not just in ingredients, but in quantities, methods, oven times and temperatures.
       I was struck by how many commercial recipe sites there are, often trying to sound like a real person, and all touting for business. I was shocked - shocked, I say! - to see the New Zealand Women's Weekly featuring a "Classic Apple Crumble", using cans of diced apples. (I expect this kind of heresy from Wattie's Food in a Minute, and sure enough, it had canned apples too, plus jam.) Saving time? Not really - it also says to rub the butter in by hand, when it's much quicker to do it (by careful pulses) in a food processor. I haven't tried melting the butter and stirring it in, as some recipes say - would this work? I'm doubtful.
        The Woolworths recipe uses fresh apples, but tells you to cook them first. So does Jamie Oliver (the only non-NZ recipe I looked at). I thought the whole point was to put fresh sliced apples (maybe with other fruit) under the topping, then cook the whole thing slowly in the oven along with something else that takes a while, like a casserole.
        Oven times and temperatures are another bone of contention. Lots of recipes with precooked apples, or even sometimes with sliced ones, say 20 minutes at 180C, and that's just not long enough. My old Easy As Pie textbook says not to have the oven too hot, or the fruit "will bubble up and spoil the topping" - but Harvey says that's exactly what he wants it to do.
          He's a stickler for tradition - he likes his topping thick, and made with white flour only. Others are more adventurous. As well as the basic butter, sugar (choose your kind) and flour (white or wholemeal, with or without a little baking powder), toppings can include a little or a lot of rolled oats, coconut, ground almonds, and/or spices. The amount of butter varies from skimpy (producing dull, stodgy topping, in my experience) to generous.

Very few recipes give the number of servings. Jamie says his serves 5, but the whole raw topping weighs only 125g - barely a quarter of a cup each, which does seem a bit sparse.
         In the end I went for a Cuisine recipe, because it used fresh, not precooked apples and had a unique variation I wanted to try: mixing the rolled oats with honey and half the butter, melted, then baking them for 20 minutes spread out on a tray lined with baking paper, before mixing them with the butter/flour, sugar, and cinnamon, and cooking for 50 minutes at 180C.
         It tasted good, with a nice toasty flavour, but because the apples weren't proper cooking ones (like Ballarat), I think they needed to cook a bit longer (with foil over the top to stop it getting too brown). And despite its name, we like our crumble a bit less crumbly and more sort of solid. Fewer rolled oats, more flour, maybe more butter.
           If you have a favourite apple crumble recipe you love and swear by, let me know. But please, no canned apples.

Saturday, April 3, 2010

Dark chocolate


Buying two blocks of dark chocolate on special before Easter, I saw the woman ahead of me at the checkout had three. We looked at each other and she said, "It's a basic food group!" My friends divide into any kind, milk only, dark only, and fair trade only. I waver between the last two.

Tomorrow, Easter Sunday, we have friends coming for lunch. Diane is bringing a dish of rabbit (of which more later) and I am in charge of the rest. It seemed fitting to have a chocolate dessert, so today I made Jo Seagar's chocolate creams. She suggests making them in little espresso coffee cups - they're so rich that the servings need to be kept small. But my little coffee cups are really tiny, so I used glass teacups instead.

Providing you have a food processor or blender, this recipe takes all of five minutes, but you do need to make it in the morning, or preferably the day before, so it's well set.


Espresso Cups of Chocolate Cream (adapted from Jo Seagar)
250 g dark chocolate
(It works just as well with 150g. You can use flavoured chocolate - orange, peppermint - but I prefer plain dark)
3 egg yolks
3 tablespoons of matching flavouring - liqueur, brandy (my favourite), strong sweetened black coffee
(I use 2 tbsps if I'm using less chocolate)
A few drops of vanilla if liked (and I do)
300 ml cream

Put chocolate (broken up if you're using a block) into food processor or blender. Add egg yolks and flavouring.
Heat cream until just about to boil.
Pour cream into chocolate, yolks and flavouring.
Run the machine until the racket stops.
Pour into espresso cups or ramekins or small teacups. It serves 4-6, depending on how much chocolate you use and how large the servings are.
Cover with clingfilm and chill in fridge for at least 4 hours, preferably overnight.
Take out of fridge about 15 minutes before serving.

I made three teacups plus a small ramekin for Harvey, who may or may not eat it - he probably won't have any room left after the rabbit. But it won't go to waste...