Thursday, May 24, 2012

Birthday rillettes

For my birthday dinner, Ali made a first course of rillettes, that wonderful French concoction which is like a kind of heavenly cross between pate, terrine and the very best brawn. She served them with bread and butter, tiny gherkins (cornichons) and her own feijoa chutney. Magnifique.
         She's very kindly given me her recipe, which is a well tried and tested blend of recipes by Lois Daish, Elizabeth David, Stephanie Alexander and Nigel Slater. 
          "Traditionally, rillettes were made with very fatty meat, and sealed with fat to preserve them. Nowadays pork is much leaner, and we have fridges - but for the recipe to work you still need some fat. If the meat looks too lean, ask your butcher for some extra pork fat. The recipe can also be used to make duck or rabbit rillettes. If using rabbit, add 500 gm of pork belly to provide enough fat."

Ali's pork rillettes

1.5 kg of skinned pork belly, cut into chunks
1 Tbsp salt
Freshly ground black pepper
2-3 bay leaves
2-3 sprigs of thyme
3 cloves of garlic, peeled and crushed
1 cup (250 ml) water.

1. Place the meat in a large bowl, with the salt, pepper, bay leaves, thyme and garlic. Mix well, cover and leave overnight in the fridge. 
2. Next day, transfer meat etc to a heavy casserole dish with a lid. Add 1 cup water, cover, and cook in a slow oven (140° to 150° C) for three hours or until the meat is very tender. Check occasionally, and adjust the temperature if necessary: the meat must cook very gently, otherwise it will develop an unpleasant sandy texture. (You can also use a slow cooker, but Ali hasn't tried that so can't say how long to cook it for. I would suggest about 5 hours, but check it carefully to see it isn't drying out or overcooking - you don't want sludge.)  
3. Remove casserole from oven (or ceramic pot from slow cooker) and allow to cool slightly. Strain the meat through a large sieve or colander over a bowl, to collect all the fat and meat juices. (There should be about 1½ to 2 cups of liquid.) Transfer the pieces of meat to a separate bowl, removing any bones, and the bayleaves and thyme, as you do so.
 4. Traditional method: Use two forks to tear the meat into fine shreds. Add the drained liquid and mix gently together. The resulting mixture should be quite soft and moist, though it will become firmer once the fat has set.  
OR, using a food processor: in 2 batches, ‘pulse’ the meat and liquid until well combined but still a little chunky.
5. Taste carefully, and add a little extra salt and/or pepper if necessary (it may not need any, as the meat has been well seasoned to start with). Pack into jars and seal. When cool, store in the fridge.
6. Bring to room temperature before serving with crusty bread or toast, little gherkins, and a fruity chutney. Leftovers can be kept in the fridge for up to a week, or frozen.

Rillettes are hard to photograph so that they look as good as they taste, but I've done my best. This may look like a small helping, but (a) rillettes are very rich, and (b) it was the first of seven courses! Of which more later.


Monday, May 7, 2012

Lazy-cook dinner for one

I didn't post last week because I didn't have anything I considered interesting enough to write about. But tonight I made myself such a nice little dinner I thought I'd share it. It can of course be sized up to work for two or three or four, and you can play around with it to suit what you have handy.
            What I happened to have was: a nice piece of pork fillet, about 14 cm long and 4 cm thick - just right for me - along with some rich leftover sauce from the slow-cooked chicken I made last week, with apricots,  prunes and red wine, plus 5 rather ancient dried apricots which I'd had the foresight to soak in boiling water the night before, and two softish, longish Jersey Benne spuds, the last of a box.


I looked up The Lazy Cook (Harvey bought it, it was one of his favourites) to see whether I could flash-roast such a small piece of pork.


It seemed to be okay, so I heated the oven to 220C on fan forced, sprayed a small roasting dish with olive oil, and sprayed and salted the pork. Then I followed his suggestion about putting the pork on a bed of the soaked apricots, cut through into their separate halves.


I peeled the spuds, cut them lengthwise into 1/2 cm slices, put them flat on the tin around the apricots, sprayed them with olive oil and put the tin on the top rack of the oven. I cut up some pieces of broccoli to microwave separately. The apricot soaking water went into the sauce, ready to microwave in its Pyrex bowl.
         Then I set the table. I bought a new lamp recently, two halogens on a black pole, so I could stand it near my chair. It's always felt a bit too dim sitting there by myself, so the extra light was just what I needed to persuade me to eat properly, instead of having a tray on my lap.
          The Lazy Cook recommends 12-15 minutes for each inch of thickness. But when I tested the pork it was nowhere near the proper temperature in the middle - it should be 70C/160F, you certainly don't want rare pork. So I turned the potato slices and put it all back for another few minutes, while I cooked the broccoli and heated up the sauce. Then I took the tin out, checked the temperature and let the pork rest while I warmed my plate in the turned-off oven (with the potatoes on it to keep hot). It's these very small things that make all the difference, even when it's just for me.


So here it is, and it was absolutely delicious from start to finish. Well, the first slice was a tiny bit dry (it's been cut off already in the photo, as usual I started eating before I remembered to take one), but the rest of it was perfectly moist, marvellous with the apricots. The potatoes worked really well too, I wasn't sure if they'd cook that fast or maybe burn, but they were fine. I felt I'd taken good care of myself.

Thursday, April 26, 2012

Fit for a goddess

I've been in Auckland visiting friends and family.  I'm lucky - everywhere I stayed, we had lovely food.

I envy my sister's organisation and efficiency. We all went out Saturday morning and got home quite late.

No problem - she took a home-made pizza from the freezer, popped it in the oven, tossed together a salad, produced a fat round loaf from Farro Fresh, et voila - a great lunch.


I had my neighbour in for dinner before I flew off. Thinking about dessert, I suddenly remembered that I had two Black Boy peaches in the fridge - they'd been hard when I bought them, so I stowed them away for later. They have a very short season (probably over for this year, look out for them next March). For the last wedding anniversary dinner I had with Harvey in March 2010, I'd used them to make a dessert from the Les Mimosas cookbook he'd bought me a few years back. 


It was written by two New Zealanders who "followed their dream", buying a nineteenth century house in Languedoc and turning it into a guest house serving "good, honest cuisine". (My first reaction when I read about people like this is always pure envy - then I think of all the hard work.) It's a lovely book, arranged by seasons. 

The recipe calls for "peches de vigne" - pink-skinned, white-fleshed peaches which grow in vineyards (and are known locally as "les tétons de Vénus" - Venus's nipples). But The Eco Gardener, a blog written by my old friend Christine Dann, says that a red-fleshed form of the vineyard peach, which seems to be much the same as the Black Boy, "has been commercialised in Soucieu-en-Jarest, the self-styled capital of the Peche de Vigne". So perhaps I'm using a true vineyard peach after all. She also says that the name "Black Boy" seems to be a totally New Zealand thing, and New Zealand is the current world capital for this variety.  

Peaches poached in muscat
4 ripe but firm Black Boy peaches, washed and dried
250 ml water
200g white sugar (the recipe says 250g but I find this a bit too sweet)
1 split vanilla pod (I used vanilla paste instead)
juice of 1 lemon
1 fresh bay leaf
150ml muscat wine (or another good dessert wine)
(the original recipe also has star anise, but I intensely dislike aniseed flavour, so I leave this out)

- Combine the water and sugar in a large saucepan and bring to the boil, stirring so that all the sugar dissolves.
- Add the vanilla, lemon juice, bay leaf, and 100ml of the muscat.Then add the peaches and adjust the heat so that the liquid is gently simmering. Depending on the size of the peaches, they will take about 20 minutes to cook. (I found I had to turn the peaches so as to make sure they were evenly cooked.)
- Carefully lift the peaches out of the syrup with a slotted spoon. Put aside to cool.


- Continue to reduce the syrup, raising the heat, until the liquid has reduced by two-thirds (be careful not to reduce it too much). 
- Stir in the last 50ml of muscat. Sieve the liquid into a jug and leave it to cool.
- When the peaches are cool, carefully remove their skins - they should slide off easily.
- Either slice the peaches in half and remove the stones, or leave them whole. Place two halves or a whole peach in each shallow dessert bowl or plate and pour the syrup over. Serve with a small glass of lightly chilled muscat or dessert wine. The colour is astonshing and the flavour is - Venusian.


Thursday, April 12, 2012

Brownish

I had a friend coming for lunch today. We'd agreed that we'd just go down to Gamboni's (my friend ahd never been there) and buy salamis and cheeses. But I finished my work a bit early yesterday, so I decided to try out a Healthy Food Guide recipe from Sunday's paper for healthy(ish) brownies, made with apple puree instead of eggs and butter.
         I had all the ingredients, sort of. I had dark chocolate, but no white (I don't like white chocolate anyway, it has no right to be called chocolate at all), so I used milk chocolate buttons instead. And I had no pecans, but I did have a few walnuts. (When I looked it up on-line, the recipe did use walnuts, and didn't mention white chocolate.) 
         It was extremely easy to make, and it worked pretty well. I think my mixture was a trifle drier than it should have been (which is odd, because I had fewer nuts), because it didn't exactly "pour" into the tin, as instructed, and it came out with a lumpy top instead of a smooth one. But it was beautifully dark, and while it didn't have the amazing melt-in-the-mouth texture of a really good traditional brownie, it was well worth the (very slight) effort. My friend thought so too, but she suggested it really shouldn't be called "brownie". So I thought maybe "brownish" would be better. This recipe is a combination of the online version here and the one in the Sunday Star-Times, 10 April 2012, plus my own variations.

Brownish
1 cup unsweetened apple purée or sauce
1/3 cup cocoa powder (I used Dutched cocoa)
3/4 cup self-raising flour (next time I might try a little less and see what happens)
1/2 teaspoon baking soda
1/2 cup sugar
1/2 teaspoon salt
1/2 cup dark chocolate chips (I used little chopped-up bits of Whittaker's dark Ghana)
1/2 cup milk chocolate buttons
1/2 cup walnuts, chopped
icing sugar for dusting

Preheat oven to 175°C. Line a 20x20cm baking dish with baking paper.

Place purée in a medium-sized bowl. Sift in cocoa, flour and baking soda. Add sugar and salt. Mix until just combined (do not over-mix as this will toughen the brownies). Gently fold in the two kinds of chocolate and the walnuts. 

Transfer to prepared baking dish. Bake for about 25-30 minutes, or until the centre feels set and fudgy when a skewer is inserted. Cool in pan for 5-10 minutes before turning out. Cool completely before slicing into squares. Dust with sifted icing sugar before serving, if desired.


It looked darker and richer than this in real life. The bits of dark chocolate didn't melt much, but I liked it like that.

Thursday, April 5, 2012

Getting my goat

What I eat when I'm having dinner on my own varies enormously. The one constant is that I try to work out what I fancy in time to produce it that night.
        On Tuesday I didn't have much in the fridge. There was some bacon, so I considered spaghetti carbonara, but somehow that didn't hit quite the right note. So I went down to the shops to see what spoke to me, and at Gamboni's I saw their goat's cheese, fromage de chèvre, and some tinned cherry tomatoes. A different kind of pasta, then?
         But when I got home I had another idea. How about a light, delicious goat's cheese soufflé? I had a look at the internet and found several recipes, but it was this one that appealed most - especially as I just happened to have a couple of courgettes. From Jan Gardner (who's based at Meola Kitchen in Westmere, Auckland), it was broadcast on Nine to Noon about a year ago.
          I've given the original quantities below, but I halved them. That made me one medium soufflé (I scoffed the lot) and two small ones to reheat later as an entrée for my neighbour and me (not strictly proper, I know, but who cares, they still taste wonderful).

Goat's cheese and zucchini soufflé (slightly adapted from Jan Gardner)
4 zucchini, coarsely grated
Zest of 2 lemons
125g goat cheese, cut into small dice
80g butter
350ml milk, warm
60g plain flour
1 tablespoon cream
1 tablespoon grated Parmesan
salt and pepper
nutmeg
4 eggs, separated - you will need 3 yolks and 4 whites
Tiny pinch of cream of tartar

Set oven to 180°C and butter 6 x 150ml ramekins (or one large soufflé dish, or two medium ones).
Place 20g butter and zucchini into a medium heavy-bottomed saucepan and sauté for 3 minutes. Remove from heat and place mixture in a sieve over a bowl so some of the excess liquid can drain out.
In the same pan, melt the remaining 60g butter over low heat. Off the heat, stir in the flour. Cook, stirring constantly, for 4-5 minutes.  Whisk in warmed milk and stir until it thickens. 
Remove from heat. Stir in zucchini, lemon zest, goat's cheese, cream and Parmesan, and cool for 5 minutes.
Add 3 yolks to mixture, one by one.  Season with salt and pepper and a few gratings of nutmeg.


Whip whites to soft peaks, adding pinch of cream of tartar halfway through. (This is the equivalent of beating the whites in a copper bowl - it helps to hold the air in.) Fold gently into mixture. 
Place in ramekins or straight-sided soufflé dishes and bake 12-15 minutes until firm and puffed, or longer for larger dishes - the soufflé should be well risen and should wobble only very slightly when nudged.
(If in doubt, I stick a very long, thin, warmed knife blade in to see if it comes out clean. It makes a few dishes, but I washed up while it was cooking, so I didn't have to face them afterwards.)
To serve, gently part the souffle into each portion with two large metal spoons.


  As you can see, my larger one didn't rise brilliantly. I think that was partly because I put in the second egg yolk (halving everything, I was using only 2 eggs), and partly because the eggs were a bit small, so there was less egg white than there should have been to raise this much mixture - especially as it was a bit weighed down with the cheese and zucchini. It tasted wonderful all the same - very light and delicate, but completely satisfying (with a bit of good bread and butter on the side). And with the veges neatly built in, I didn't need anything else - except, of course, a glass of wine.

Sunday, April 1, 2012

Back from Rarotonga


Ah, Rarotonga. The part of the island we were staying in was like the nicest possible New Zealand seaside retreat, only with wonderful warmth and better sand and water. The local superette, a few minutes’ walk away, had proper cone icecreams and fresh tropical fruit, and the owner of the big house gave us more. I ate masses of it – golden pawpaw, pink guavas, pink passionfruit, pink watermelon, and little green bananas cut from the tree in the garden (forgot to photograph those). With the Palm Grove breakfast the first three days, there were home-made muffins as well...


For the three nights on my own, I had the restaurant barbecue (broadbill steak), 
then cooked a nice little ribeye steak with local veges, and a kind of pasta with tinned salmon (to buy fresh fish, you have to time it right).

After that I was with a family group, and they wanted to eat out, so I happily tagged along. Fresh local tuna, seared as part of a salad nicoise, with thin crunchy local beans. Broadbill in coconut curry. Delicious. Marinated fresh fish (I don’t know what kind) at the Friday night dinner with drums, song and dance, up the mountain. At the wedding itself, a whole roast pig, basted with seawater as it cooked. The last night we had the tuna Bruce and his mates caught, barbecued for us to eat with the usual generous Sunday night salad array at the restaurant over the road. 
       
By the time I got back, I really fancied some meat. So for dinner with neighbours on Friday, I splashed out on a small lamb fillet. 
         The recipe was a summer one I used to make for Harvey, from a great book his mother Betty gave us. The original has spinach leaves, but I used the new crop of lettuce from the garden - oakleaf, red cos and freckles.


Roasted lamb fillet on a young leaf salad with garlic dressing 
(Adapted from Homes and Gardens Cookbook, Brian Glover, 1996)

Lamb
About 300-350g lamb fillet (the Silver Fern pack at the supermarket is 340g)
1/2 tsp whole cummin seeds (though I used ground cummin)
1/2 tsp whole coriander seeds (I had these in the garden!)
black pepper, salt
1 Tbsp extra virgin olive oil

Dry-toast the coriander and cummin in a small pan over a low heat for a few minutes, then grind coarsely (I use my cleaned-out coffee grinder to do this). 
Wash and dry the fillet and roll it in the ground spices. Grind over some black pepper. (You can do this first part a few hours in advance if you want to - the lamb will pick up more flavour.)
Preheat oven to 200C (fan forced if you have it).
Heat olive oil in a large heavy pan till hot, then brown the fillet on all sides.
Place in a small roasting tin, season with salt, and cook for - well, it depends how rare you want it. It should be beautifully rosy inside when it's cut and served. For me this took about 20 minutes.
Turn oven down to 190C and leave on for garlic (see below).
Cover with foil and leave to rest while you do everything else.


Salad
Assortment of young salad leaves
2-3 Tbsp of green herb sprigs (I used sorrel, parsley and chives)
1 plump head of garlic
3 Tbsp extra virgin olive oil
1 tsp French mustard (Dijon is good)
1 Tbsp balsamic vinegar or lemon juice
1-2 Tbsp plain yoghurt
black pepper, salt

Wash and dry the leaves and herbs (a spinner is good). 
As soon as you take out the meat and turn down the oven, trim the hard top off the garlic, sit it in a piece of foil, dribble 1 Tbsp of olive oil over it, wrap it up and put it in the oven to roast (about 30 minutes).
When it's soft, carefully squeeze all the garlic out of its skin into a blender or small bowl, witht he oil.
Mash it to a puree, then beat in the other 2 Tbsp oil, the mustard, and the vinegar or lemon jiuce. Just before you're ready to serve, add the yoghurt. Taste and add salt and pepper as required.
Lay the salad out on a large shallow serving plate and drizzle over the dressing.
Slice the lamb thinly and arrange it down the centre.
We had tiny potatoes with this, but crusty bread or pilaf rice or brown rice are all good too. You can scatter toasted pine nuts over it too (but at $85 a kilo I usually leave them out). Instead I threw in a few strips of yellow pepper to look pretty. This was taken after our first serving, I get too hungry and forget. And it's a bit fuzzy, I'd had rather more pinot than usual. But believe me, it was good.


Thursday, March 8, 2012

Nothing but apricots

For lunch with friends on Saturday, I wanted a light dessert to follow the antipasti, beef and cheese. I can't remember when I first made apricot suedoise, but it must have been close to twenty years ago. I found it in my ancient paperback of Cordon Bleu Desserts and Puddings, by Rosemary Hume and Muriel Downes, published in 1975 [not 1875 as I mistakenly typed when I posted this!]. It's an invaluable source of classic recipes, and you can still buy the Penguin paperback online.

What I like about this recipe, apart from being able to make it a day in advance, is that the ingredients are so simple - basically just apricots, plus sugar, gelatine and a little lemon juice. I used big firm Otago apricots - they would have been even better if they'd been just a little riper, but because you cook them, it doesn't really matter. The only variation from the original recipe is that I leave out the almonds that are meant to go in the poached fruit halves - they look pretty, but I don't think their hard little intrusion is a good idea. I've also translated the measurements into metric.


Apricot Suedoise (there should be an acute accent over the e, but that's hard to do on my computer)
~ Halve and remove stones from 1 kg fresh apricots.
~ Make a sugar syrup by boiling 350ml water with 170g sugar and a strip of lemon peel in a medium saucepan. Remove the peel.
~ Cook the fruit in two batches. Choose the eight best halves and place them rounded side down, cut side up in the syrup. Bring it slowly back to a very gentle boil and cook until tender, but still retaining their shape.
~ Lift these halves out carefully with a slotted spoon and place them (I prefer rounded side down, but it's up to you) evenly round the bottom of a metal ring tin.


~ Cook the rest of the fruit until very tender. Cool a little and reduce fruit and syrup to a puree in either a food processor or a blender.
~ Extract the juice from 1/2 a large lemon or a whole small lemon. Put it in a small metal bowl and make it up to 5 tablespoons with water. Soak 2 tablespoons of powdered gelatine in this mixture. Hold the bowl over simmering water and stir to dissolve the gelatine. Stir it thoroughly into the puree (I just whizz it all up again briefly).


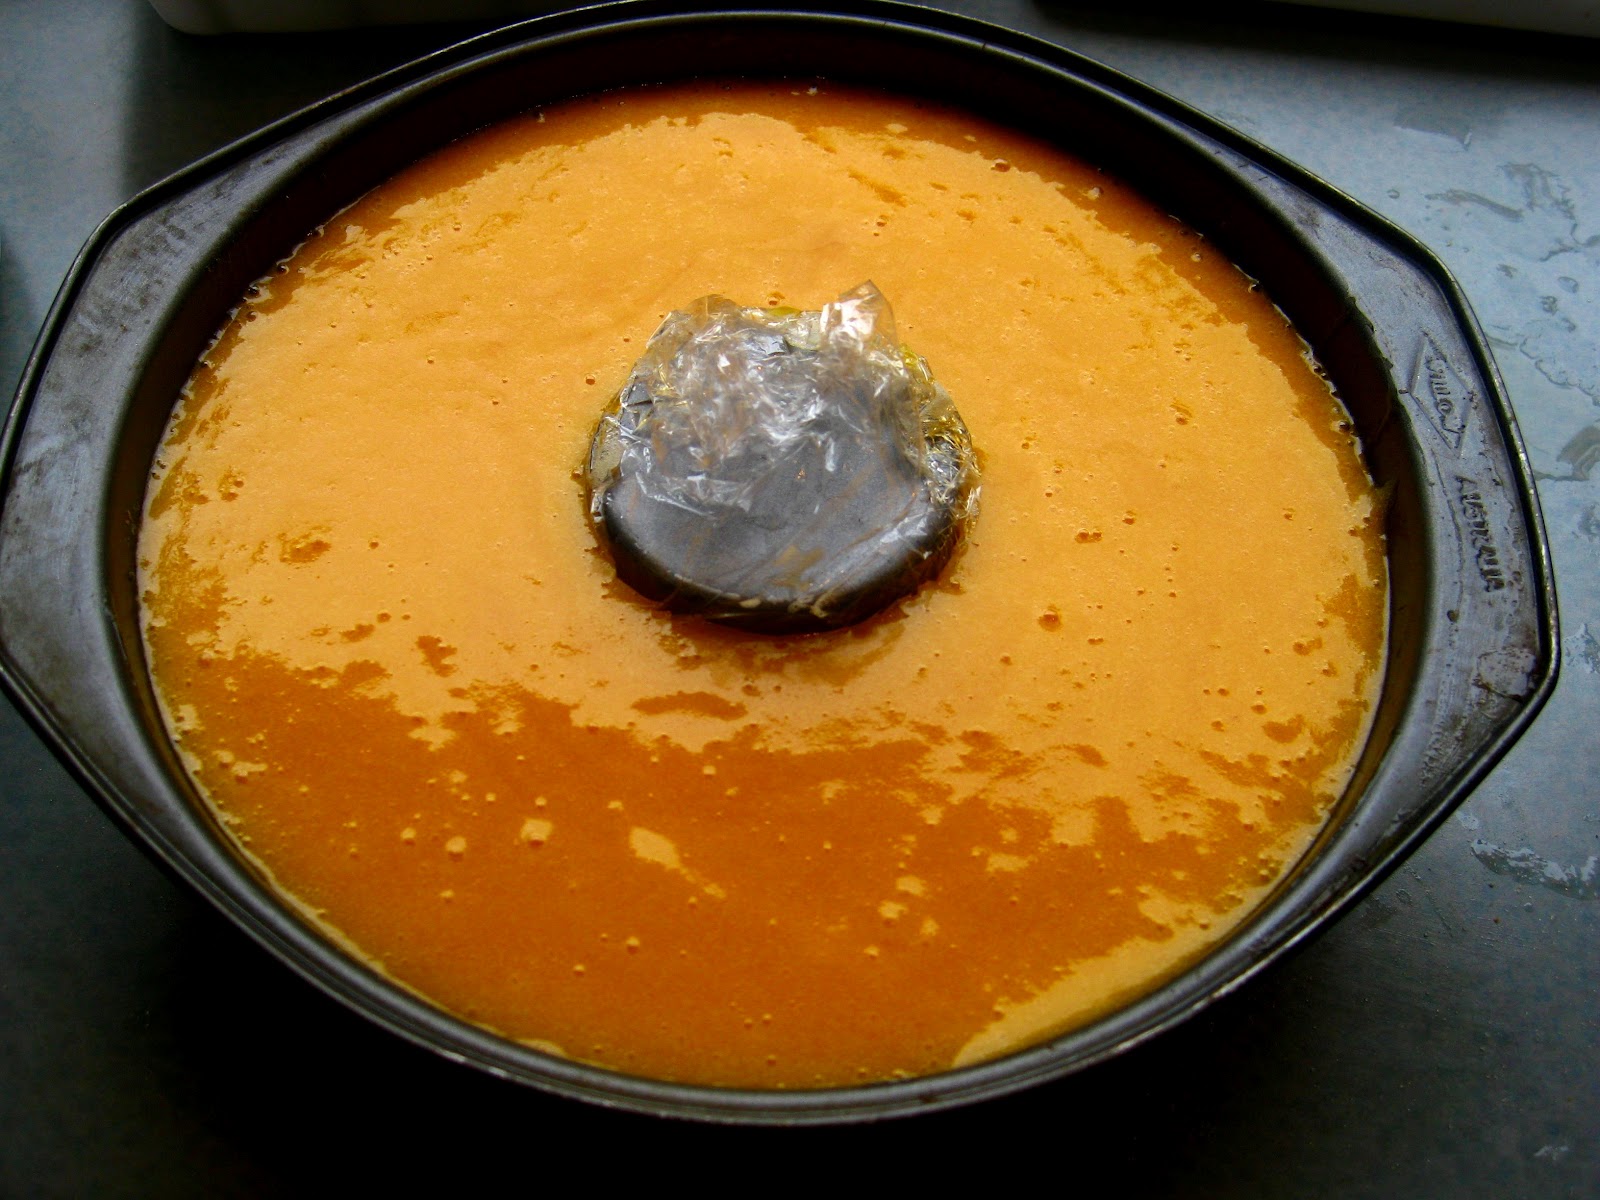
~ Pour the puree into a glass jug (if you've used a processor) and leave it to cool. When it looks as if it's starting to set, pour it carefully over the apricot halves to almost fill the ring tin. (I tried putting clingwrap round the centre bit first, so it would come out more easily - it sort of worked.)


~Cover with clingwrap and leave to set in the fridge. (You could probably get away with making this in the early morning, but it's easier to do it the day, or night, before.)
~ Take it out of the fridge about an hour before you want to serve it. Just before serving, twirl the tin carefully in a sink of hot water, then put a big plate over it and upend it. With a bit of tapping on the base, it should come out cleanly.


If you like, you can fill the space in the middle with something - cream, yoghurt, chopped fresh apricots (maybe soaked in brandy and sugar for a bit), strawberries, even flowers. Or not.  (Mine is filled with the bit of clingwrap, which I forgot to take out before I took the photo.) The main point is the incredibly intense apricot flavour of the suedoise, which I think is perfect all by itself.